Importing 2D and 3D files: Difference between revisions
No edit summary |
No edit summary |
||
| (2 intermediate revisions by 2 users not shown) | |||
| Line 4: | Line 4: | ||
<td width="79%"> | <td width="79%"> | ||
<!-- contenu --> | <!-- contenu --> | ||
<h1 class="title_page">Importing 2D and 3D files</h1> | |||
< | |||
< | |||
You can import different types of file formats to InSitu, namely .BMP, JPG, PNG, TIF, WMF, DXF, 3DS and ALK. | |||
<br/>The WMF, BMP, JPG, PNG and TIF formats are for imagery. | |||
<br/>The DFX format is in 2D or 3D. | |||
<br/>The 3DS and ALK formats are in 3D. | |||
'''<big>Importing Images (.JPG, .BMP, .PNG, .TIF)</big>''' | |||
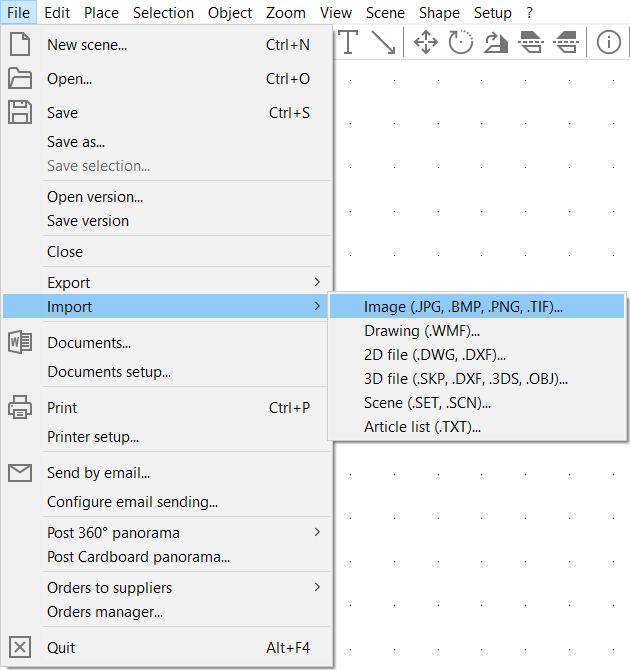
1 - Go to the '''File''' drop down menu, then click on '''Import | Image (.JPG, .BMP, .PNG, .TIF)''' (Fig.33a) | |||
2 - In the dialog box, choose the file that you wish to import, | |||
3 - Click on '''Open''' | |||
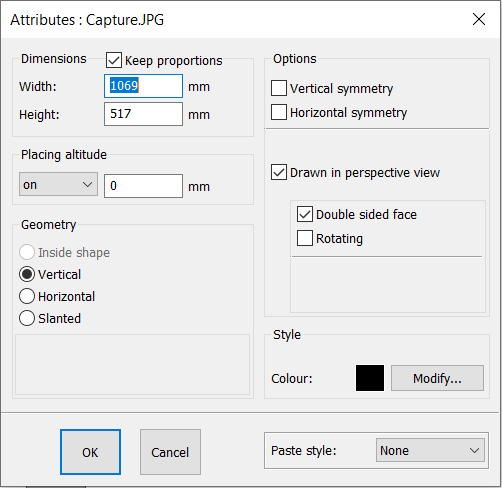
5 - | 4 - Another dialog box will open allowing you to choose and/or modify the width, the height, the placement height, the geometry, the options and the style, (Fig.33b) | ||
5 - Click on the '''OK''' button. | |||
<div align="center"> | <div align="center"> | ||
<p class="cadreimg"> | <p class="cadreimg"> | ||
[[Image: | [[Image:Importfichier_ENG.png|link=]] | ||
</p></div> | </p></div> | ||
<div align="center"> | <div align="center"> | ||
<p class="cadreimg"> | <p class="cadreimg"> | ||
[[Image: | [[Image:Importfichier2_ENG.png|link=]] | ||
</p></div> | </p></div> | ||
'' | ''Width''': width of the image. | ||
'' | ''Height''': height of the image. | ||
'' | ''Placement height''': the height position of the bottom of the image. | ||
'' | ''Geometry On shape''': fills the shape with the image. | ||
'' | ''Vertical Geometry''': the image will be in a vertical position. | ||
'' | ''Horizontal Geometry''': the image will be in a horizontal position. | ||
''' | ''Inclined Geometry''': you can define the image's angle. | ||
'' | ''Width symmetry options''': the image will be turned on its width. | ||
'' | ''Height symmetry options''': the image will be turned on its height. | ||
'' | ''Drawn in top view''': the image will be visible in top view. | ||
'' | ''Drawn in perspective''': the image will be visible in perspective. | ||
''Double side''': the image is visible from both sides. | |||
'' | ''Swivel''' : the image will always be visible from the obserer's position. | ||
'' | ''Decor towards the top''': the image will be visible from above. | ||
'' | ''Decor towards the bottom''': the image will be visible from below. | ||
'''<big> | '''<big>Importing DXF 2D (.DXF)</big>''' | ||
1 - | 1 - In the '''File''' drop down menu, click on '''Import | DXF 2D (.DXF)'''... | ||
2 - | 2 - In the dialog box, choose the file that you want to import, | ||
3 - | 3 - Click on '''Open'''. | ||
The file will only be visible in 2D. You can use it as a backdrop as you draw the shape above it to elevate the walls. To do so, click on the strategic points of the DFX plan without needing to measure anything (as long as the DFX is on the right scale). | |||
'''<big> | '''<big>Importing 3D files (.DXF, .3DS, .ALK)</big>''' | ||
1 - | 1 - In the '''File''' drop down menu, click on '''Import | 3D file (.DXF, .3DS, .ALK)…''' | ||
2 - | 2 - In the dialog box, choose the file that you want to import | ||
3 - | 3 - Click on '''Open'''. | ||
These files will be stuck in their original colour. | |||
Make sure that these files are not too heavy in terms of number of faces. | |||
ALK files are a bridge between InSitu and Obvie. | |||
<!-- fin contenu --> | <!-- fin contenu --> | ||
| Line 102: | Line 104: | ||
</table> | </table> | ||
<span class="btnretour">[[#top| | <span class="btnretour">[[#top|Back top of page]]</span> <span class="btnhome">[[Creating a palette of textures|Next step]]</span> | ||
Latest revision as of 13:40, 6 August 2024
Importing 2D and 3D filesYou can import different types of file formats to InSitu, namely .BMP, JPG, PNG, TIF, WMF, DXF, 3DS and ALK.
Importing Images (.JPG, .BMP, .PNG, .TIF) 1 - Go to the File drop down menu, then click on Import | Image (.JPG, .BMP, .PNG, .TIF) (Fig.33a) 2 - In the dialog box, choose the file that you wish to import, 3 - Click on Open 4 - Another dialog box will open allowing you to choose and/or modify the width, the height, the placement height, the geometry, the options and the style, (Fig.33b) 5 - Click on the OK button.
Width': width of the image. Height': height of the image. Placement height': the height position of the bottom of the image. Geometry On shape': fills the shape with the image. Vertical Geometry': the image will be in a vertical position. Horizontal Geometry': the image will be in a horizontal position. Inclined Geometry': you can define the image's angle. Width symmetry options': the image will be turned on its width. Height symmetry options': the image will be turned on its height. Drawn in top view': the image will be visible in top view. Drawn in perspective': the image will be visible in perspective. Double side': the image is visible from both sides. Swivel' : the image will always be visible from the obserer's position. Decor towards the top': the image will be visible from above. Decor towards the bottom': the image will be visible from below.
Importing DXF 2D (.DXF) 1 - In the File drop down menu, click on Import | DXF 2D (.DXF)... 2 - In the dialog box, choose the file that you want to import, 3 - Click on Open. The file will only be visible in 2D. You can use it as a backdrop as you draw the shape above it to elevate the walls. To do so, click on the strategic points of the DFX plan without needing to measure anything (as long as the DFX is on the right scale).
Importing 3D files (.DXF, .3DS, .ALK) 1 - In the File drop down menu, click on Import | 3D file (.DXF, .3DS, .ALK)… 2 - In the dialog box, choose the file that you want to import 3 - Click on Open. These files will be stuck in their original colour. Make sure that these files are not too heavy in terms of number of faces. ALK files are a bridge between InSitu and Obvie.
|
|


