Top view: Difference between revisions
No edit summary |
No edit summary |
||
| (6 intermediate revisions by 2 users not shown) | |||
| Line 3: | Line 3: | ||
<td width="80%" valign="top"> | <td width="80%" valign="top"> | ||
<!-- contenu --> | <!-- contenu --> | ||
<h1 class="title_page">Top view</h1> | |||
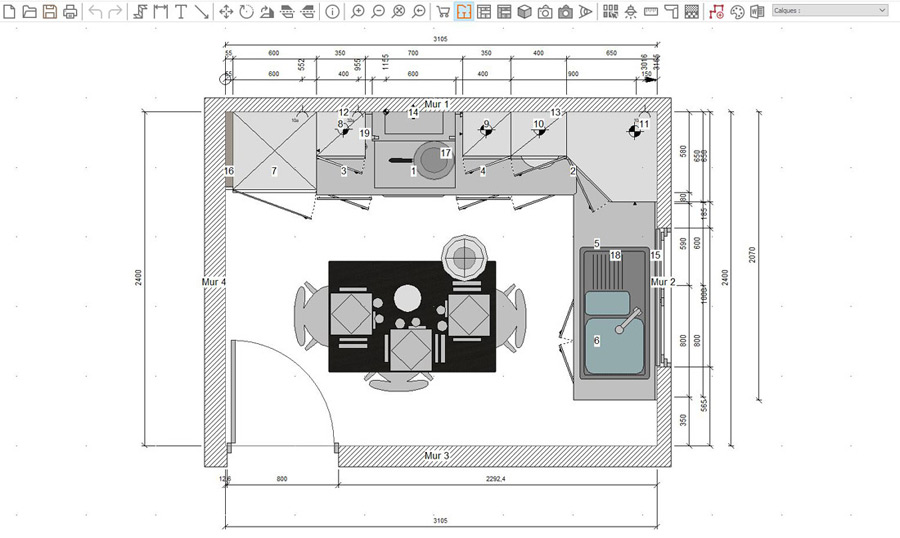
The top view allows you to see the plan of the scene. | |||
<div align="center"> | <div align="center"> | ||
| Line 10: | Line 11: | ||
</p></div> | </p></div> | ||
Top view is one of the views that you will use the most. Building walls, placing constraints, positionning your furniture and decorations, adding your floors and ceilings, you will mostly perform these tasks in top view. | |||
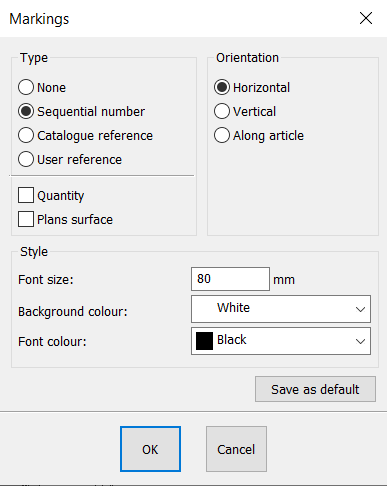
Each element placed in the scene will have a number on them. This number refers to the order that the elements were placed. They are also called marks. You have the option of changing some attributes by going to '''Scene | Mark...'''. | |||
<div align="center"> | <div align="center"> | ||
<p class="cadreimg"> | <p class="cadreimg"> | ||
[[Image: | [[Image:Marquage_ENG.png|link=]] | ||
</p></div> | </p></div> | ||
[[Image:1orange.png|left|link=]] | [[Image:1orange.png|left|link=]] The type: no mark, the order numbers (by default), the catalogue references, the user references (can be changed in the attributes of the object). | ||
<br/> | <br/> | ||
[[Image:2orange.png|left|link=]] | [[Image:2orange.png|left|link=]] The style: the size of the characters, the colour and the background colour. | ||
<br/> | <br/> | ||
[[Image:3orange.png|left|link=]] | [[Image:3orange.png|left|link=]] The orientation: allows the text to always be horizontal, always vertical or to follow the orientation of the object (by default). | ||
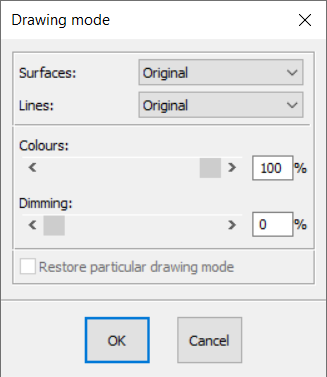
'''Drawing mode''' | |||
After selecting an object, you have the option of modifying its '''Drawing mode'''. To do so: | |||
1 - Select an object | |||
2 - Click on the '''Selection''' drop down menu and then on '''Drawing mode'''. A dialog box will appear. | |||
<div align="center"> | |||
<p class="cadreimg"> | |||
[[Image:Modedessin_ENG.png|link=]] | |||
</p></div> | |||
3 - Change, as needed, the various information contained in the dialog box: | |||
<br>- the filling-in style | |||
<br>- the style or thickness of the lines | |||
<br>- the colour | |||
<br>- the attenuation | |||
| Line 40: | Line 63: | ||
</table> | </table> | ||
<span class="btnretour">[[#top| | <span class="btnretour">[[#top|Back top of page]]</span> <span class="btnhome">[[Elevation views|Next step]]</span> | ||
Latest revision as of 14:22, 7 August 2024
Top viewThe top view allows you to see the plan of the scene.
Top view is one of the views that you will use the most. Building walls, placing constraints, positionning your furniture and decorations, adding your floors and ceilings, you will mostly perform these tasks in top view.
Drawing mode After selecting an object, you have the option of modifying its Drawing mode. To do so: 1 - Select an object 2 - Click on the Selection drop down menu and then on Drawing mode. A dialog box will appear.
|
|


