Creating a new project: Difference between revisions
Jump to navigation
Jump to search
No edit summary |
No edit summary |
||
| Line 11: | Line 11: | ||
<br>Voir le tutoriel vidéo | <br>Voir le tutoriel vidéo | ||
</p></div> | </p></div> | ||
A new scene is created through different successive steps corresponding to the order of the different tutorials making up the "Design" path. | |||
1- ''' | 1- '''Entering client information''' | ||
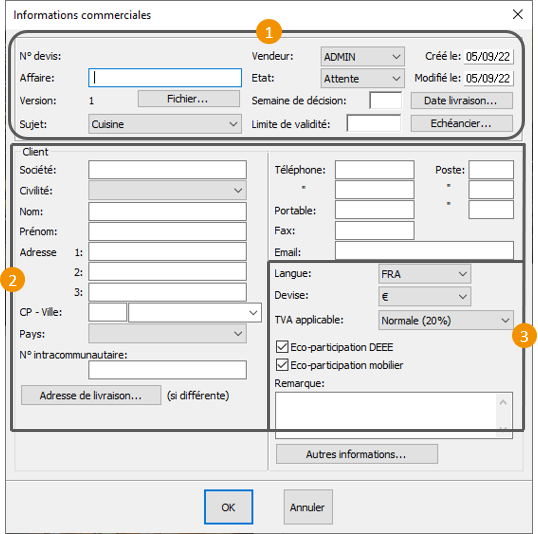
In the '''File''' drop down menu, choose '''New scene'''. A new window entitled '''Business information''' will appear on your screen. | |||
<span class="chiffre">1</span> | <span class="chiffre">1</span> In here, you can find the current state of the folder (pending, agreement, refusal) with all the information concerning the delivery and installation date. Thanks to the schedule button, you can set up a schedule. | ||
<span class="chiffre">2</span> | <span class="chiffre">2</span> About client information. Only the boxes "Name" and "Company" are mandatory in order to start. The rest of the information is optional and can be filled in at a later time by going to '''Scene | Information'''. | ||
<span class="chiffre">3</span> | <span class="chiffre">3</span> Here, you will find all the pricing information and you can choose the VAT rate applied to the project (Normal, reduced, or other) as well as the currency. | ||
At any time, you can change all this information by going to the '''Scene''' drop down menu and choosing '''Information'''. | |||
<div align="center"> | <div align="center"> | ||
| Line 32: | Line 32: | ||
</div> | </div> | ||
For example, enter Thompson into the "'''Name'''" box. | |||
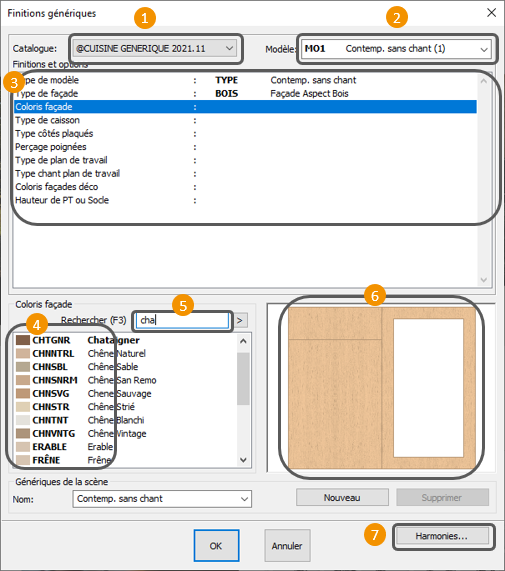
Click on the "'''OK'''" button or press '''ENTER''' on your keyboard. A new window, named '''Generic finishes (Fig.11b)''' then appears onscreen. It lets you choose the model and the finishes of the furniture that will be placed afterward. | |||
2- ''' | 2- '''Choosing your generic finishes''' | ||
<div align="center"> | <div align="center"> | ||
| Line 44: | Line 44: | ||
</p></div> | </p></div> | ||
<span class="chiffre">1</span> | <span class="chiffre">1</span> Choose the manufacturer catalogue that you want to design your project with</p> | ||
<span class="chiffre">2</span> | <span class="chiffre">2</span> Via the drop down menu, choose one of the available models. | ||
[[Image:LogoInfo.png]] | [[Image:LogoInfo.png]]Careful, if the models exist as models without handles, then they have been duplicated. You will find the list of models without handles below the models with handles. | ||
<span class="chiffre">3</span> | <span class="chiffre">3</span> Fill in the finishes and the options | ||
<span class="chiffre">4</span> | <span class="chiffre">4</span> For each finish or option chosen in <span class="chiffre">3</span>, then new choices will be offered. The system only offers choices that exist in the catalogue. | ||
<span class="chiffre">5</span> | <span class="chiffre">5</span> It is possible to directly enter the catalogue reference so as to find your colours and choice of options. | ||
<span class="chiffre">6</span> | <span class="chiffre">6</span> As you go along and confirm your choices, visuals will allow you to check if you're happy with them. | ||
<span class="chiffre">7</span> | <span class="chiffre">7</span> In some ways, harmonies are your favourites. You can save your generic finishes so that you can reuse them for other projects. | ||
3- ''' | 3- '''The dimensions of the scene, placing walls''' | ||
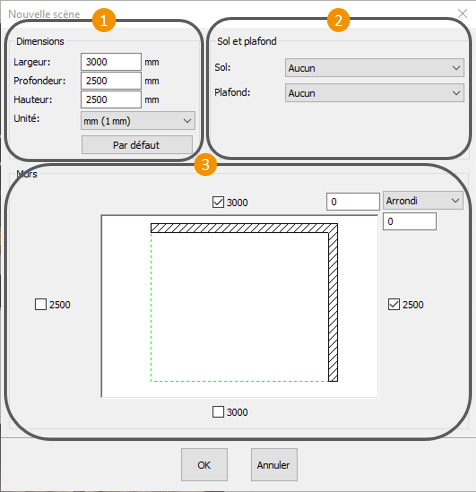
Click on the "'''OK'''" button or press '''ENTER''' on your keyboard. A new dialog box will pop up on your screen, named '''New scene'''. It allows you to: | |||
<span class="chiffre"> | <span class="chiffre">1</span> specify the base dimensions of your implantation (overall interior of the room) and the height of the walls | ||
<span class="chiffre">3</span> | <span class="chiffre">2</span> choose, if needed, a type of ground | ||
<span class="chiffre">3</span> if the wall set up is simple (linear implantation, parralel, "L" or "U") tick some of the four boxes located around the white triangle in area of the group "Walls" so that they represent your wall set up | |||
<div align="center"> | <div align="center"> | ||
| Line 78: | Line 78: | ||
[[Image:LogoInfo.png|link=]] | [[Image:LogoInfo.png|link=]] If the way your walls are set up is more complicated and can't be specified by ticking the boxes described above, don't tick any box; the walls will then need to be drawn with the help of a '''shape'''. | ||
Click on the " '''OK''' " button, or press on '''ENTER''' on your keyboard. | |||


