Placing jambs: Difference between revisions
No edit summary |
No edit summary |
||
| Line 16: | Line 16: | ||
''<big>Jambs</big>''' | |||
For jambs and panels, the top view is better as the jambs and panels will be set against the furniture. | |||
Let's take the example of an island. | |||
Search for your jamb reference in your manufacturer catalogue. Then, enter the necessary dimensions (the width corresponds to the thickness of the jamb, it will be entered by default for manufacturer catalogues), the depth depends on what you need, in our example it will consist of the width of the worktop and finally enter the height. | |||
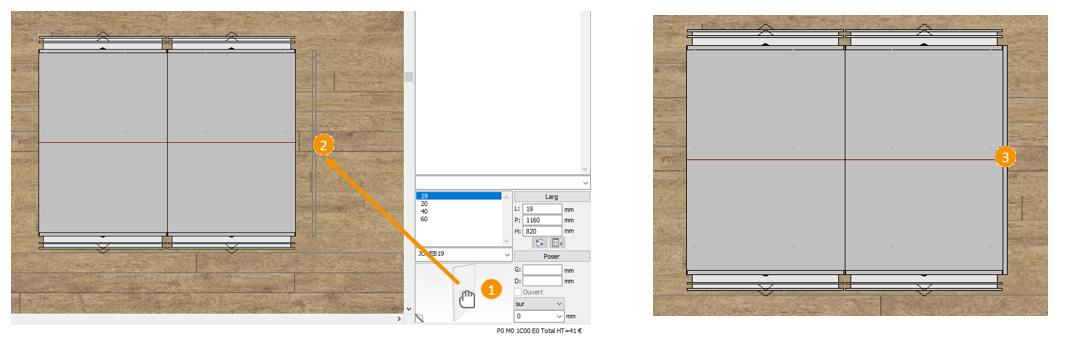
<span class="chiffre">1</span> | <span class="chiffre">1</span> Click on the chosen article's previsualisation graphic zone with the left mouse button and keep it held down. The mouse cursor will transform into the silhouette of a hand. | ||
<span class="chiffre">3</span> | <span class="chiffre">2</span> Slide the mouse cursor towards the work area to where the article should be. Note that the silhouette of the article slides along with the mouse cursor. | ||
<span class="chiffre">3</span> Release the left mouse button when the jamb is level with the body of the piece of furniture. Your jambs will automatically and correctly place themselves. | |||
<div align="center"> | <div align="center"> | ||
Revision as of 13:08, 19 April 2023
|
For jambs and panels, the top view is better as the jambs and panels will be set against the furniture. Let's take the example of an island. Search for your jamb reference in your manufacturer catalogue. Then, enter the necessary dimensions (the width corresponds to the thickness of the jamb, it will be entered by default for manufacturer catalogues), the depth depends on what you need, in our example it will consist of the width of the worktop and finally enter the height. 1 Click on the chosen article's previsualisation graphic zone with the left mouse button and keep it held down. The mouse cursor will transform into the silhouette of a hand. 2 Slide the mouse cursor towards the work area to where the article should be. Note that the silhouette of the article slides along with the mouse cursor. 3 Release the left mouse button when the jamb is level with the body of the piece of furniture. Your jambs will automatically and correctly place themselves.
|
|

