Modifying shapes: Difference between revisions
(Created page with "<table width="100%"> <tr> <td width="80%" valign="top"> <!-- contenu --> <div align="center"> <p class="cadrevideo"> <youtube width="500" height="300"> https://www.youtube.com/watch?v=KIwtnfV0IZk </youtube> <br>Voir le tutoriel vidéo </p></div> Once a shape has been drawn, it is possible to make changes relating to the lines as well as the angles. '''<big>Changing the length of a line</big>''' 1. Select the end dot of a line which length you would like to change....") |
No edit summary |
||
| (4 intermediate revisions by the same user not shown) | |||
| Line 3: | Line 3: | ||
<td width="80%" valign="top"> | <td width="80%" valign="top"> | ||
<!-- contenu --> | <!-- contenu --> | ||
Once a shape has been drawn, it is possible to make changes relating to the lines as well as the angles. | |||
'''<big>Changing the length of a line</big>''' | |||
<div align="center"> | <div align="center"> | ||
<p class="cadrevideo"> | <p class="cadrevideo"> | ||
<youtube width="500" height="300"> | <youtube width="500" height="300"> | ||
https://www.youtube.com/watch?v= | https://www.youtube.com/watch?v=bEg8SzfHfM4&list=PL7MrU2icgiqHL8DQabTVIISu8qHmE7mPJ&index=5 | ||
</youtube> | </youtube> | ||
<br> | <br> | ||
</p></div> | </p></div> | ||
1. Select the end dot of a line which length you would like to change. | 1. Select the end dot of a line which length you would like to change. | ||
| Line 25: | Line 27: | ||
<div align="center"> | <div align="center"> | ||
<p class="cadreimg"> | <p class="cadreimg"> | ||
[[ | [[Image:1012.JPG|link=]] | ||
</p></div> | </p></div> | ||
| Line 40: | Line 42: | ||
<div align="center"> | <div align="center"> | ||
<p class="cadreimg"> | <p class="cadreimg"> | ||
[[ | [[Image:Angle.JPG|link=]] | ||
</p></div> | </p></div> | ||
'''<big>Changing the angle between two lines through triangulation</big>''' | '''<big>Changing the angle between two lines through triangulation</big>''' | ||
<div align="center"> | |||
<p class="cadrevideo"> | |||
<youtube width="500" height="300"> | |||
https://www.youtube.com/watch?v=otssy5viqRI&list=PL7MrU2icgiqHL8DQabTVIISu8qHmE7mPJ&index=6 | |||
</youtube> | |||
<br> | |||
</p></div> | |||
1. Select the dot that joins the two lines whose angle you would like to change. | 1. Select the dot that joins the two lines whose angle you would like to change. | ||
| Line 55: | Line 65: | ||
<div align="center"> | <div align="center"> | ||
<p class="cadreimg"> | <p class="cadreimg"> | ||
[[ | [[Image:Angletriangulation_EN.png|link=]] | ||
</p></div> | </p></div> | ||
<!-- fin contenu --> | <!-- fin contenu --> | ||
| Line 64: | Line 74: | ||
<td valign="top" width="20%"> | <td valign="top" width="20%"> | ||
{{: | {{:En_Gabarits}} | ||
</td> | </td> | ||
| Line 70: | Line 80: | ||
</table> | </table> | ||
<span class="btnretour">[[#top|Retour haut de page]]</span> <span class="btnhome">[[ | <span class="btnretour">[[#top|Retour haut de page]]</span> <span class="btnhome">[[Creating overflows, circular arcs|Next Step]]</span> | ||
Latest revision as of 15:05, 4 December 2023
|
1. Select the end dot of a line which length you would like to change. 2. Select Shape | Modify | Length. The Length text box refers to the legth of the line that precedes the selected dot: it will initially be equal to the line's current length. The Movement text box refers to the relative length change that you want to be applied to the line: it will initially be zero. A positive value in Movement will increase the line's length and a negative value will decrease it. Note that a change to either text box will lead to a change in the other, as they automatically ajust to each other. 3. Either enter the new line length in Length or the value of its increase (positive value) or decrease (negative value) in Movement and confirm.
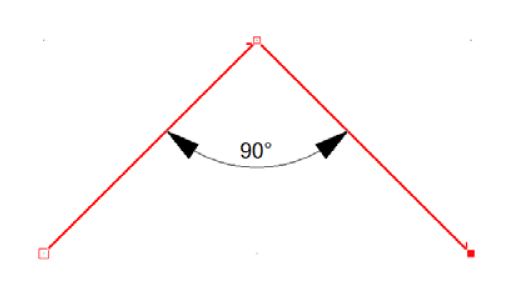
1. Select the dot that joins the two lines whose angle you would like to change. 2. Select Shape | Modify | Angle. The Angle (°) text box refers to the internal angle formed between the two lines (expressed in degrees): initially, it will be equal to the angle's current value. The Delta (°) text box refers to the change in the angle that you wish to carry out: it will intially be set as zero. Note that a change to either text box will lead to a change in the other, as they automatically ajust to each other. 3. Enter the new internal angle in the Angle (°) text box or the value of the desired change in the Delta (°) text box and confirm.
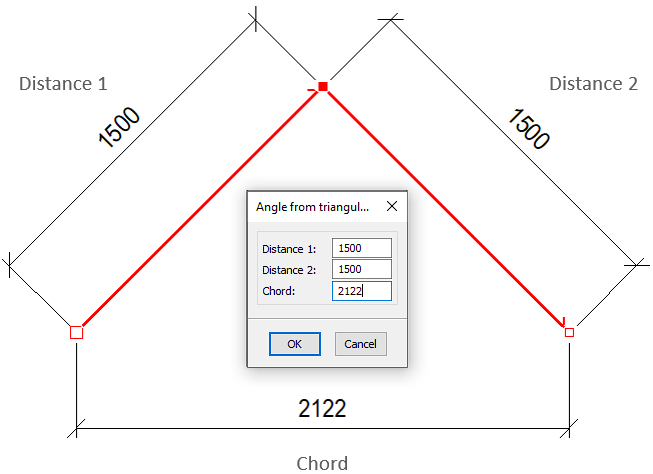
1. Select the dot that joins the two lines whose angle you would like to change. 2. Select Shape | Modify | Angle by triangulation. The Side 1 (and Side 2) text box refers to the measurement of the line preceding (or following) the selected dot. The Rope refers to the measurement that forms a triangle with the two other values. The measurements for these three values define the internal angle that is formed between the two lines that join at the selected point. 3. Fill in the three triangulation values, usually taken from a client or a paper plan, and confirm.
|
|


