Saving and printing the project: Difference between revisions
No edit summary |
No edit summary |
||
| (3 intermediate revisions by 2 users not shown) | |||
| Line 1: | Line 1: | ||
<table width="100%"> | <table width="100%"> | ||
<tr> | <tr> | ||
<td width="80%"> | <td width="80%"> | ||
<!-- contenu --> | <!-- contenu --> | ||
<h1 class="title_page">Saving and printing the project</h1> | |||
There are a few different ways to save your design, by clicking on the '''File''' drop down menu: | There are a few different ways to save your design, by clicking on the '''File''' drop down menu: | ||
1. '''File | Save''' : Saves the scene under the title of '''Company''' and '''Business''' or '''Surname''' and '''Name''' that you entered when creating the scene in the '''Business Information''' window. | 1. '''File | Save''' : Saves the scene under the title of '''Company''' and '''Business''' or '''Surname''' and '''Name''' that you entered when creating the scene in the '''Business Information''' window. | ||
2. '''File | Save''' : Saves the scene under the title of '''Company''' and '''Business''' or '''Surname''' and '''Name''' that you can change in the '''Business Information''' window that pops up. | 2. '''File | Save as''' : Saves the scene under the title of '''Company''' and '''Business''' or '''Surname''' and '''Name''' that you can change in the '''Business Information''' window that pops up. | ||
3. '''File | Save version''' : Saves the scene under the title of '''Company''' and '''Business''' or '''Surname''' and '''Name''' that you entered when creating the scene in the '''Business Information''' window by increasing the version. You can save several different versions of the same project. | 3. '''File | Save version''' : Saves the scene under the title of '''Company''' and '''Business''' or '''Surname''' and '''Name''' that you entered when creating the scene in the '''Business Information''' window by increasing the version. You can save several different versions of the same project. | ||
| Line 62: | Line 62: | ||
</table> | </table> | ||
<span class="btnretour">[[#top|Back top of page]]</span> <span class="btnhome">[[ | <span class="btnretour">[[#top|Back top of page]]</span> <span class="btnhome">[[Updating an old project with a recent rate|Next step]]</span> | ||
Latest revision as of 14:18, 7 August 2024
Saving and printing the projectThere are a few different ways to save your design, by clicking on the File drop down menu: 1. File | Save : Saves the scene under the title of Company and Business or Surname and Name that you entered when creating the scene in the Business Information window. 2. File | Save as : Saves the scene under the title of Company and Business or Surname and Name that you can change in the Business Information window that pops up. 3. File | Save version : Saves the scene under the title of Company and Business or Surname and Name that you entered when creating the scene in the Business Information window by increasing the version. You can save several different versions of the same project.
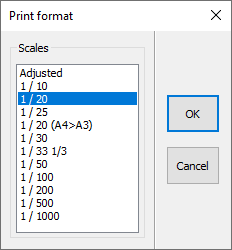
If you want to make sure that the view fits well in the frame, click on Zoom | Adjusted. To start printing, click on File | Print. If you want to print a top or elevation view, a dialog box entitled Printing format will appear, asking you to choose the scale which you want the view printed in.
The default scale is the most appropriate considering the dimensions of the area you want to print as well as the format and orientation of the paper. If you want to, you can choose a different scale, or choose adjusted if you would like InSitu to make the scene best fit the paper, without worrying about a standardised scale. Then, press on "OK" or click on the ENTER key to keep printing, or choose "Cancel" to cancel it. If you're printing a virtual reality or photorealistic perspective view, the Image resolution dialog box will appear, asking you to choose the resolution, which is to say at which fineness the view will be printed in (number of dots in width and in height compared to your screen resolution).
The "x1" screen resolution is useful as the printing will start very quickly, the image calculation having already been done on screen. However, if you want your printings to have a higher resolution than what is displayed on screen, choose "x 1,5", "x 2" or "x3". These choices will lead to a new image calculation and this calculation will take slightly more time than the screen image. Indeed, the "x 3" choice will, for example, result in an image with 9 times more pixels than what is displayed on screen. When in realist perspective, you have the option of choosing an output resolution towards the printer, with vector mode being very slow with processing languages like PCL5 or PCL6. Some printers can be very slow to print scenes in perspective view. To solve this issue, it is recommended to select the vector printing mode.
|
|


