Placing walls: Difference between revisions
No edit summary |
No edit summary |
||
| (12 intermediate revisions by the same user not shown) | |||
| Line 1: | Line 1: | ||
<table width="100%"> | <table width="100%"> | ||
<tr> | <tr> | ||
<td width="80%"> | <td width="80%"> | ||
<!-- contenu --> | <!-- contenu --> | ||
<h1 class="title_page">Placing walls</h1> | |||
<div align="center"> | <div align="center"> | ||
<p class="cadrevideo"> | <p class="cadrevideo"> | ||
<youtube width="500" height="300"> | <youtube width="500" height="300"> | ||
https://www.youtube.com/watch?v= | https://www.youtube.com/watch?v=INHVzKRqejM&list=PL7MrU2icgiqFa5_zPfdNVclL0x8F69hgP&index=3 | ||
</youtube> | </youtube> | ||
<br> | <br> | ||
</p></div> | </p></div> | ||
Walls can be placed in 3 different ways | |||
- | - when creating a new scene, in the window about the dimensions of the walls, | ||
- | - directly in the InSitu scene, | ||
- | - with the help of shapes. | ||
Let's go through each case: | |||
'''<big> | '''<big>When creating a new scene</big>''' | ||
Go to the " '''New Scene''' " dialog box, which we saw previously in creating a new scene. | |||
You can alter the angles between two walls by making cuts in "Rectangle, in "Bevel" or in "Rounded". | |||
Let's go through the 3 possibilities together: | |||
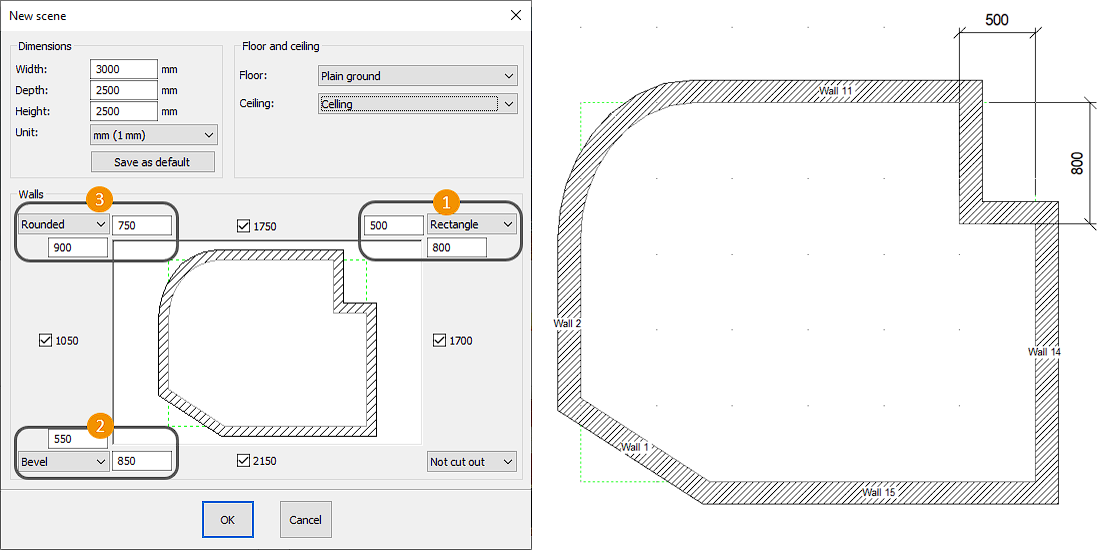
<span class="chiffre">1</span> | <span class="chiffre">1</span> Rectangle cuts: by clicking on "no cuts" in the angle that you wish to change, the three cut possibilities appear. For rectangle cuts, 2 measurements are required: the cut before the angle and the cut after the angle. For example, let's enter 500 and 600... As you can see below, the system cuts the walls 500mm before the angle and 600 mm after the angle. | ||
<span class="chiffre">2</span> | <span class="chiffre">2</span> Bevel cuts: once again, you must enter the measurements before and after the cut. Let's take 550 and 650 for example. Below is the result. | ||
<span class="chiffre">3</span> | <span class="chiffre">3</span> Rounded cuts: again, you must enter the cut measurements. We'll put in 750 and 900 as an example. The system then rounds the angle based on the new information entered. | ||
<div align="center"> | <div align="center"> | ||
<p class="cadreimg"> | <p class="cadreimg"> | ||
[[Image: | [[Image:Posemur_EN.png|link=]] | ||
</p></div> | </p></div> | ||
We have now gone through the first method of placing walls. It is particularly useful for rooms with simple layouts and InSitu beginners. | |||
If you want to create a scene with specific features (a 135° angle, rounded walls, ...), we would not recommend using this technique for placing the walls. Instead, put the overall measurements of the scene in the "Width", "Depth" and "Height" boxes, and then click on "OK" without ticking the walls. | |||
An empty scene will appear, with a yellow frame corresponding to the previously given dimensions. | |||
'''<big> | '''<big>With the "Place Wall" tool</big>''' | ||
The <b>Walls</b> icon (or F5 shortcut on your keyboard) allows you to create your own walls. When you click on it, your mouse cursor transforms and will be the starting point of your wall. | |||
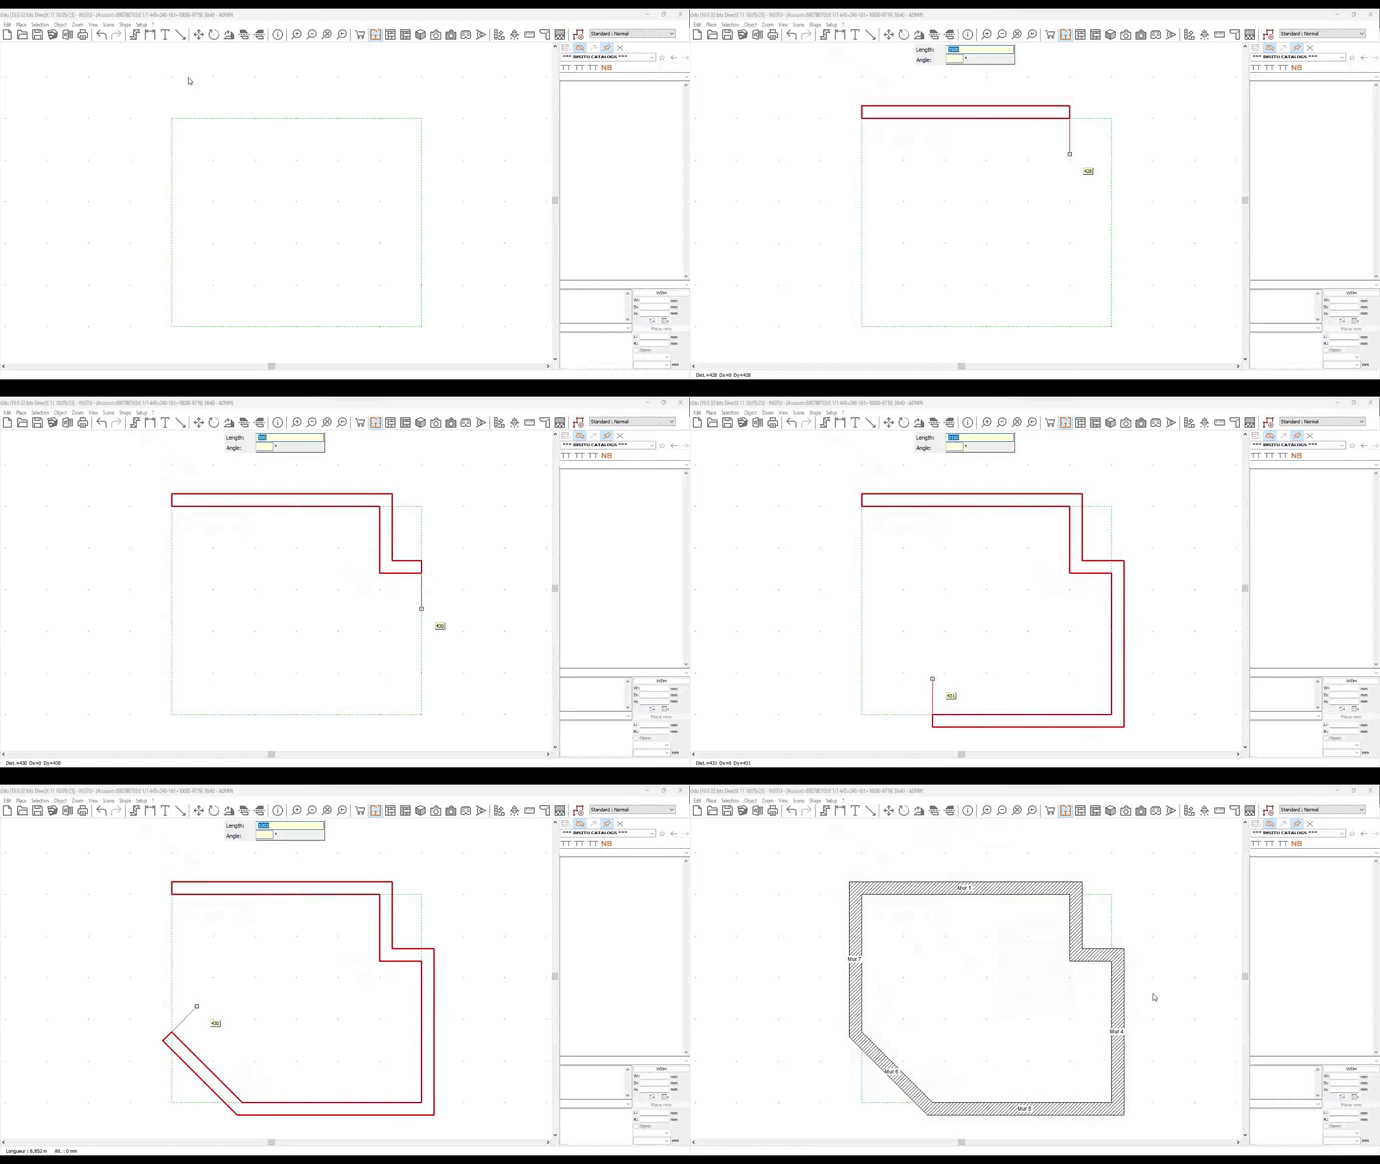
Click once to start drawing your wall and then move your cursor in the direction you want your wall to be (careful, make sure to work clockwise). | |||
A small window will appear allowing you to enter the dimensions of the wall and the angle, if needed (accessible through the TAB button). Confirm with the ENTER key. | |||
<div align="center"> | <div align="center"> | ||
<p class="cadreimg gif"> | <p class="cadreimg gif"> | ||
[[Image: | [[Image:mur2_EN.gif|link=]] | ||
</p></div> | </p></div> | ||
When you have no more walls to place, the Esc button allows you to stop creating walls. A final window will open, allowing you to enter the thickness and the height of the walls. Choose the "towards the outside" option so that your walls are placed towards the outside, therefore not disturbing the inner layout of the room. However, if you placed the walls anti-clockwise, then choose the "towards the inside" option. | |||
'''<big> | '''<big>By using shapes</big>''' | ||
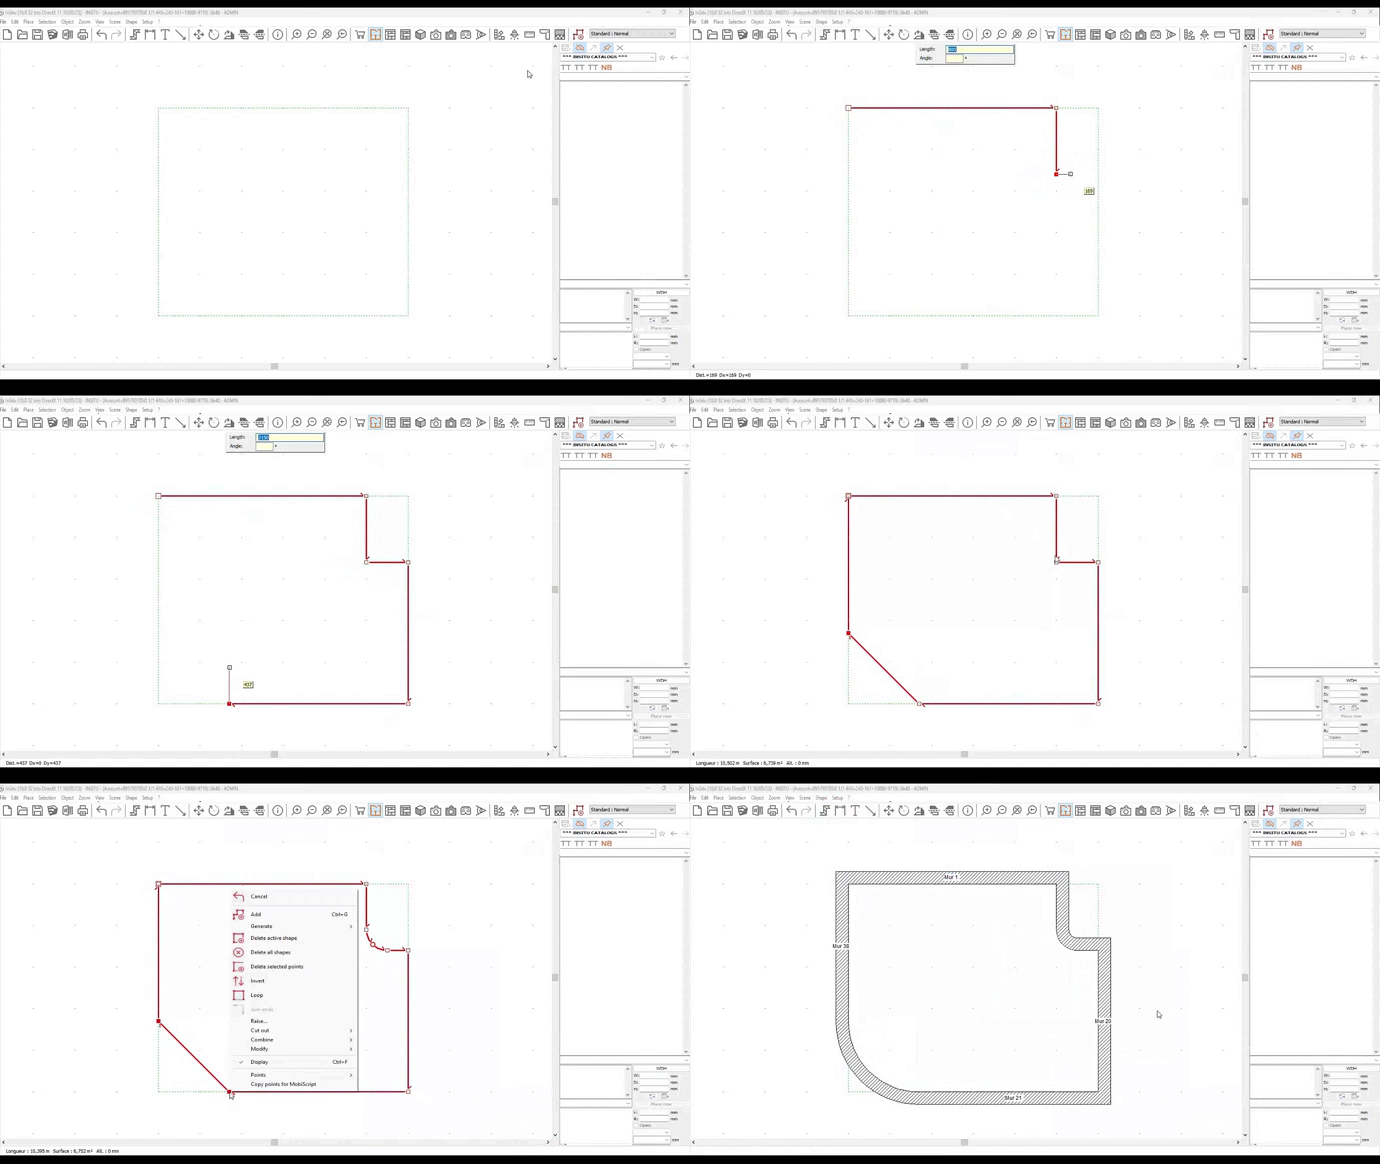
With the help of shapes, you can draw your room with specific forms and designs: for example, rounded walls, angles other than 90°, etc. Once you have finished drawing the shape, click on the <b>Walls</b> icon. The system will ask if you wish to place walls on your existing shapes. Click on "Yes" and you will transform your shapes into walls. | |||
Don't hesitate to check out our tutorials dedicated to shapes in order to see the many features of this function. | |||
<div align="center"> | <div align="center"> | ||
<p class="cadreimg gif"> | <p class="cadreimg gif"> | ||
[[Image: | [[Image:Mur3_EN.gif|link=]] | ||
</p></div> | </p></div> | ||
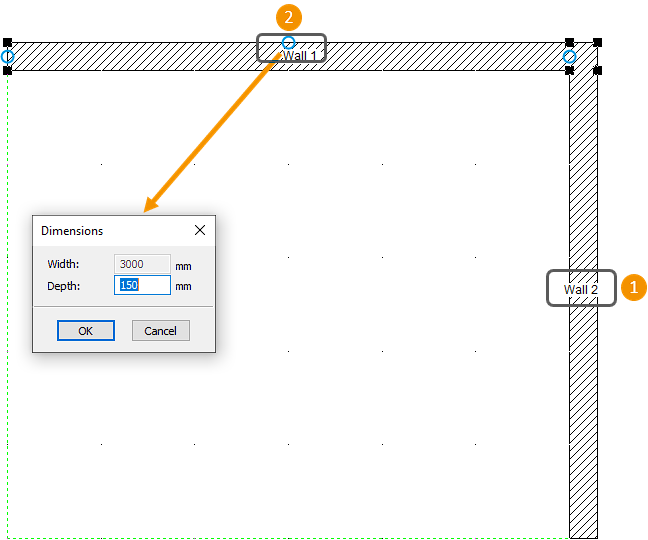
'''<big> | <span class="chiffre">1</span> '''<big>Wall markings</big>''' | ||
Like articles, the walls will now be marked, both from top view and from any elevation perspective. These markings can be deleted (via the "scene" drop down menu, then "markings"), moved (with the help of the CTRL button on your keyboard) or altered (equally via markings". | |||
<span class="chiffre">2</span> '''<big>Changing the length and thickness of a wall with your mouse</big>''' | |||
In top view, you can alter the length or thickness of a wall by stretching it using the mouse. | |||
Clicking on a wall with the mouse displays blue circles (and anchorage points). WIth these, you can lengthen or thicken your wall. | |||
When you stretch a wall, a window will pop up. This allows you to enlarge or thicken the wall to specific dimensions. | |||
<div align="center"> | <div align="center"> | ||
<p class="cadreimg"> | <p class="cadreimg"> | ||
[[Image: | [[Image:mur1_EN.png|link=]] | ||
</p></div> | </p></div> | ||
<!-- fin contenu --> | <!-- fin contenu --> | ||
| Line 120: | Line 110: | ||
</table> | </table> | ||
<span class="btnretour">[[#top| | <span class="btnretour">[[#top|Back top of page]]</span> <span class="btnhome">[[Understanding the Place window|Next step]]</span> | ||
Latest revision as of 14:25, 7 August 2024
Placing walls
- when creating a new scene, in the window about the dimensions of the walls, - directly in the InSitu scene, - with the help of shapes.
Let's go through each case:
Go to the " New Scene " dialog box, which we saw previously in creating a new scene. You can alter the angles between two walls by making cuts in "Rectangle, in "Bevel" or in "Rounded". Let's go through the 3 possibilities together: 1 Rectangle cuts: by clicking on "no cuts" in the angle that you wish to change, the three cut possibilities appear. For rectangle cuts, 2 measurements are required: the cut before the angle and the cut after the angle. For example, let's enter 500 and 600... As you can see below, the system cuts the walls 500mm before the angle and 600 mm after the angle. 2 Bevel cuts: once again, you must enter the measurements before and after the cut. Let's take 550 and 650 for example. Below is the result. 3 Rounded cuts: again, you must enter the cut measurements. We'll put in 750 and 900 as an example. The system then rounds the angle based on the new information entered.
We have now gone through the first method of placing walls. It is particularly useful for rooms with simple layouts and InSitu beginners. If you want to create a scene with specific features (a 135° angle, rounded walls, ...), we would not recommend using this technique for placing the walls. Instead, put the overall measurements of the scene in the "Width", "Depth" and "Height" boxes, and then click on "OK" without ticking the walls. An empty scene will appear, with a yellow frame corresponding to the previously given dimensions.
The Walls icon (or F5 shortcut on your keyboard) allows you to create your own walls. When you click on it, your mouse cursor transforms and will be the starting point of your wall. Click once to start drawing your wall and then move your cursor in the direction you want your wall to be (careful, make sure to work clockwise). A small window will appear allowing you to enter the dimensions of the wall and the angle, if needed (accessible through the TAB button). Confirm with the ENTER key.
When you have no more walls to place, the Esc button allows you to stop creating walls. A final window will open, allowing you to enter the thickness and the height of the walls. Choose the "towards the outside" option so that your walls are placed towards the outside, therefore not disturbing the inner layout of the room. However, if you placed the walls anti-clockwise, then choose the "towards the inside" option.
With the help of shapes, you can draw your room with specific forms and designs: for example, rounded walls, angles other than 90°, etc. Once you have finished drawing the shape, click on the Walls icon. The system will ask if you wish to place walls on your existing shapes. Click on "Yes" and you will transform your shapes into walls. Don't hesitate to check out our tutorials dedicated to shapes in order to see the many features of this function.
Like articles, the walls will now be marked, both from top view and from any elevation perspective. These markings can be deleted (via the "scene" drop down menu, then "markings"), moved (with the help of the CTRL button on your keyboard) or altered (equally via markings".
In top view, you can alter the length or thickness of a wall by stretching it using the mouse. Clicking on a wall with the mouse displays blue circles (and anchorage points). WIth these, you can lengthen or thicken your wall. When you stretch a wall, a window will pop up. This allows you to enlarge or thicken the wall to specific dimensions.
|
|


