Placing automatic linear articles: Difference between revisions
No edit summary |
No edit summary |
||
| (12 intermediate revisions by the same user not shown) | |||
| Line 1: | Line 1: | ||
<table width="100%"> | <table width="100%"> | ||
<tr> | <tr> | ||
<td width="80%"> | <td width="80%"> | ||
<!-- contenu --> | <!-- contenu --> | ||
<h1 class="title_page">Placing automatic linear articles</h1> | |||
<div align="center"> | <div align="center"> | ||
<p class="cadrevideo"> | <p class="cadrevideo"> | ||
<youtube width="500" height="300"> | <youtube width="500" height="300"> | ||
https://www.youtube.com/watch?v= | https://www.youtube.com/watch?v=fJL6nKZyhDU&list=PL7MrU2icgiqFa5_zPfdNVclL0x8F69hgP&index=6 | ||
</youtube> | </youtube> | ||
<br> | <br> | ||
</p></div> | </p></div> | ||
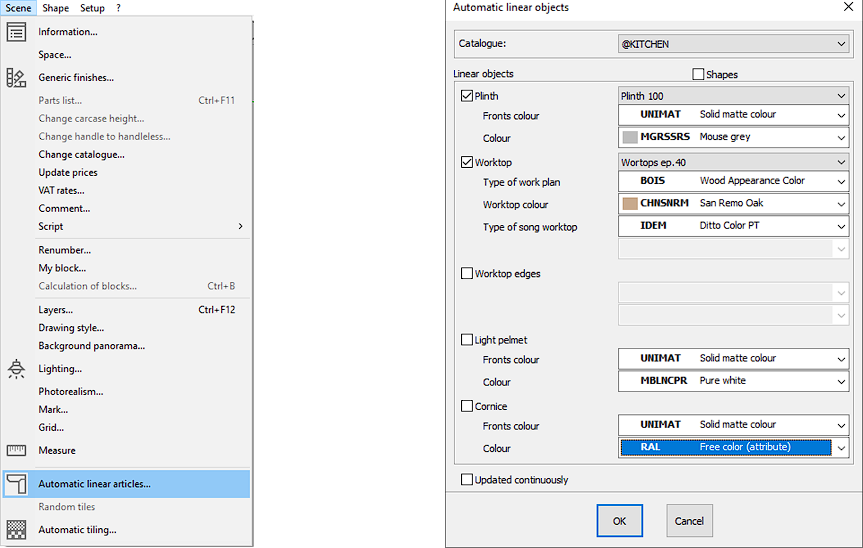
'''1.''' | The linear elements of a kitchen are the bases, the worktops, the worktop spaces to be tiled, the light pelmets and the cornices. Except in very particular cases, the placement of linears takes place automatically. To do this: | ||
'''1.''' It will allow you to choose the catalogue of origin, the type and the colouring of the linear elements that you want to place. | |||
<div align="center"> | <div align="center"> | ||
<p class="cadreimg"> | <p class="cadreimg"> | ||
[[Image: | [[Image:Lineaire1_EN.png|link=]] | ||
</p> | </p> | ||
<br/> | <br/> | ||
</div> | </div> | ||
'''2.''' | '''2.''' For each of the five different types of linears, choose the colours that you like best. Tick or untick depending on what you want to place in the scene. | ||
'''3.''' | '''3.''' Click on the "OK" button or press on ENTER. | ||
[[Image:LogoInfo.png|link=]] | [[Image:LogoInfo.png|link=]] If one or several objects were selected when you clicked on Scene | Automatic linears..., a message box containing "Only for the selected elements?" will appear on your screen. Click on "No" to let InSitu know that it should place the linears on all the objects of the layout or click on "Yes" if you want the linears to only be placed on the selected elements | ||
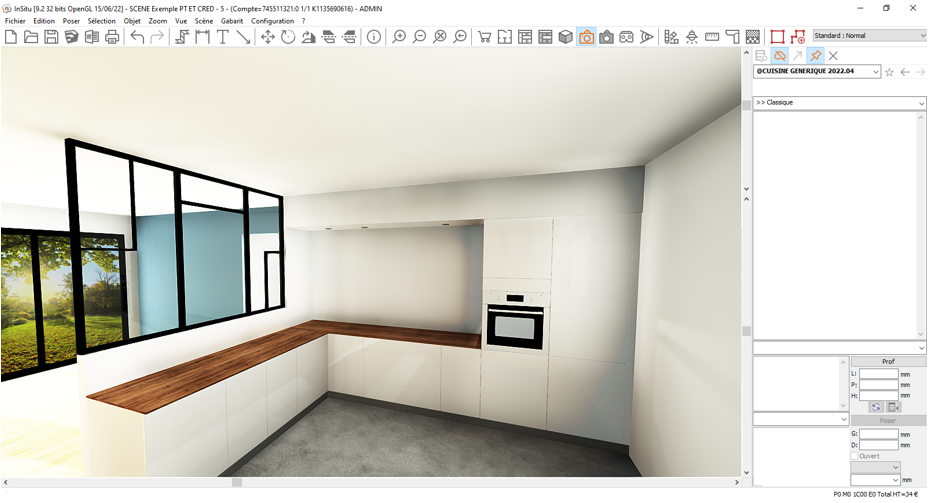
The linear elements corresponding to the ticked boxes in the dialog box will then be placed. | |||
<div align="center"> | <div align="center"> | ||
| Line 56: | Line 50: | ||
</table> | </table> | ||
<span class="btnretour">[[#top| | <span class="btnretour">[[#top|Back top of page]]</span> <span class="btnhome">[[Placing credenzas|Next Step]]</span> | ||
Latest revision as of 14:26, 7 August 2024
Placing automatic linear articles
The linear elements of a kitchen are the bases, the worktops, the worktop spaces to be tiled, the light pelmets and the cornices. Except in very particular cases, the placement of linears takes place automatically. To do this: 1. It will allow you to choose the catalogue of origin, the type and the colouring of the linear elements that you want to place.
2. For each of the five different types of linears, choose the colours that you like best. Tick or untick depending on what you want to place in the scene. 3. Click on the "OK" button or press on ENTER.
The linear elements corresponding to the ticked boxes in the dialog box will then be placed.
|
|


