Placing text, arrows, symbols: Difference between revisions
No edit summary |
No edit summary |
||
| (8 intermediate revisions by the same user not shown) | |||
| Line 4: | Line 4: | ||
<td width="80%" valign="top"> | <td width="80%" valign="top"> | ||
<!-- contenu --> | <!-- contenu --> | ||
<h1 class="title_page">Placing text, arrows, symbols</h1> | |||
<div align="center"> | <div align="center"> | ||
<p class="cadreimg"> | <p class="cadreimg"> | ||
| Line 10: | Line 10: | ||
</p></div> | </p></div> | ||
===Placing text=== | |||
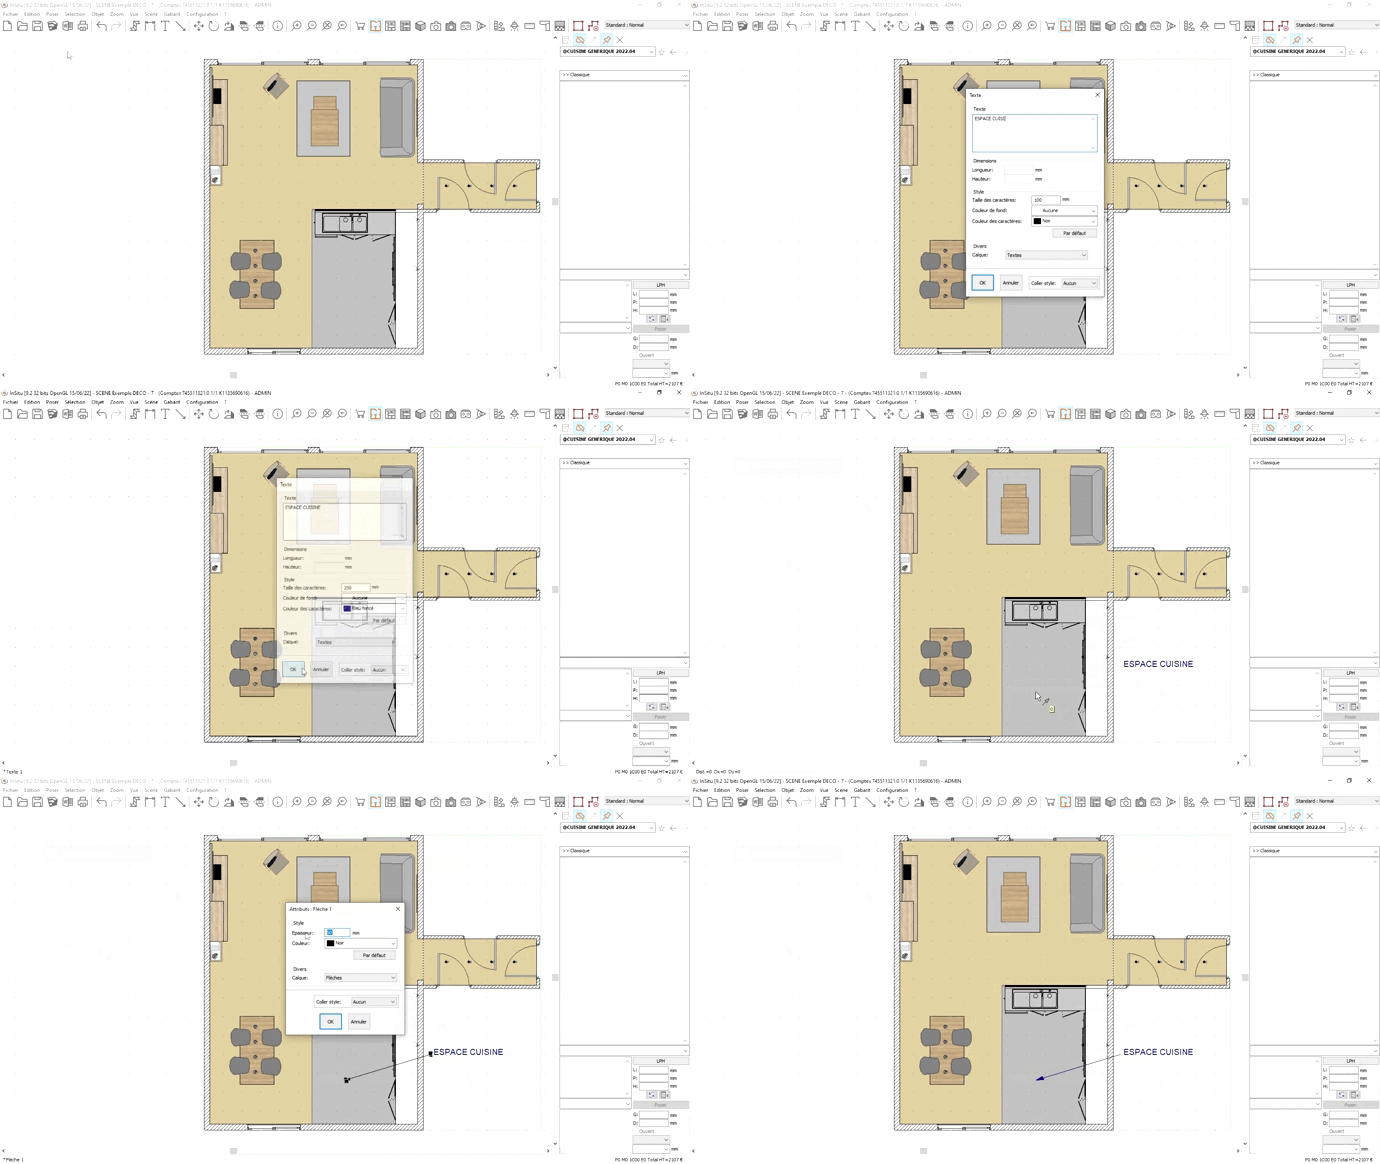
In order to display information about your scene, you have the option of placing text in InSitu. | |||
To do so, go to '''Place | Text''' | |||
A window will appear, where you can fill in your text and change the font or colour. | |||
The text will appear in the centre of your scene. You can then move it like any other object on InSitu. | |||
===Placing an arrow=== | |||
Placing an arrow can help you highlight a space so that you can put text outside of the shape itself. | |||
Placing an arrow is done via '''Place | Arrow''' | |||
The first mouse click indicates the beginning of the arrow and the second indicates the end. | |||
===Placing an elevation symbol=== | |||
<div align="center"> | <div align="center"> | ||
<p class="cadrevideo"> | <p class="cadrevideo"> | ||
<youtube width="500" height="300"> | <youtube width="500" height="300"> | ||
https://www.youtube.com/watch?v= | https://www.youtube.com/watch?v=cXSbkuvFhaI&list=PL7MrU2icgiqHmSy1Cn3UXngfTpALskqih&index=3 | ||
</youtube> | </youtube> | ||
<br>Voir le tutoriel vidéo | <br>Voir le tutoriel vidéo | ||
</p></div> | </p></div> | ||
The elevation symbol is used to see and work on 2D elements from the front. There are three ways to see an element from the front : | |||
1 - | 1 - Selecting an object (clicking on the inner edge), then going to '''View | Realistic or wireframe perspective''' | ||
2 - | 2 - Selecting a wall (clicking on the inner edge), then going to '''View | Wireframe or realistic elevation'''. By double clicking on walls, you will immediately be put into the realistic perspective. | ||
3 - | 3 - Placing an elevation symbol, which will allow you to elevate an object or a group of objects, and then via '''View | Wireframe or realistic view'''. | ||
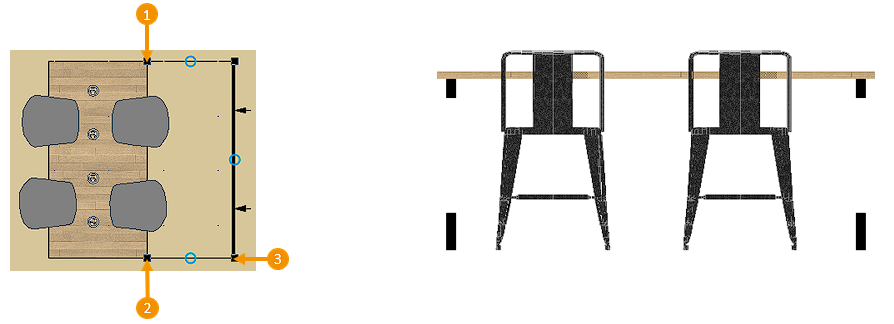
In order to place this elevation symbol, you must click on the '''Place''' button and then '''Elevation symbol''' in the ensuing drop down menu. It takes three clicks to place it: the two first to define the elevation area and the third one to determine the depth. | |||
<div align="center"> | <div align="center"> | ||
| Line 56: | Line 56: | ||
</p></div> | </p></div> | ||
If you place an object in this view, it will be placed between the first two clicks in the depth. | |||
| Line 72: | Line 72: | ||
</table> | </table> | ||
<span class="btnretour">[[#top| | <span class="btnretour">[[#top|Back top of page]]</span> <span class="btnhome">[[Saving and printing the project|Next step]]</span> | ||
Latest revision as of 14:17, 7 August 2024
Placing text, arrows, symbols
Placing textIn order to display information about your scene, you have the option of placing text in InSitu. To do so, go to Place | Text A window will appear, where you can fill in your text and change the font or colour. The text will appear in the centre of your scene. You can then move it like any other object on InSitu.
Placing an arrowPlacing an arrow can help you highlight a space so that you can put text outside of the shape itself. Placing an arrow is done via Place | Arrow The first mouse click indicates the beginning of the arrow and the second indicates the end.
Placing an elevation symbol
The elevation symbol is used to see and work on 2D elements from the front. There are three ways to see an element from the front : 1 - Selecting an object (clicking on the inner edge), then going to View | Realistic or wireframe perspective 2 - Selecting a wall (clicking on the inner edge), then going to View | Wireframe or realistic elevation. By double clicking on walls, you will immediately be put into the realistic perspective. 3 - Placing an elevation symbol, which will allow you to elevate an object or a group of objects, and then via View | Wireframe or realistic view. In order to place this elevation symbol, you must click on the Place button and then Elevation symbol in the ensuing drop down menu. It takes three clicks to place it: the two first to define the elevation area and the third one to determine the depth.
If you place an object in this view, it will be placed between the first two clicks in the depth.
|
|


