Web-Based Furniture (internet connection required): Difference between revisions
Jump to navigation
Jump to search
(Created page with "<div id="top"></div> <table width="100%"> <tr> <td width="80%" valign="top"> <!-- contenu --> ''<big>Placing furniture with the new web based catalogue (Internet connection required)</big>''' ''Placing a piece of furniture example''' 1. Choose a catalogue from the list. In our example, we will choose the catalogue nammed '''@DEMO V9''' which contains the piece of furniture we wish to place. To do so, click on the black downward-pointing arrow button on the right of th...") |
No edit summary |
||
| (One intermediate revision by the same user not shown) | |||
| Line 5: | Line 5: | ||
<!-- contenu --> | <!-- contenu --> | ||
''<big>Placing furniture with the new web based catalogue (Internet connection required)</big>''' | '''<big>Placing furniture with the new web based catalogue (Internet connection required)</big>''' | ||
''Placing a piece of furniture example''' | '''Placing a piece of furniture example''' | ||
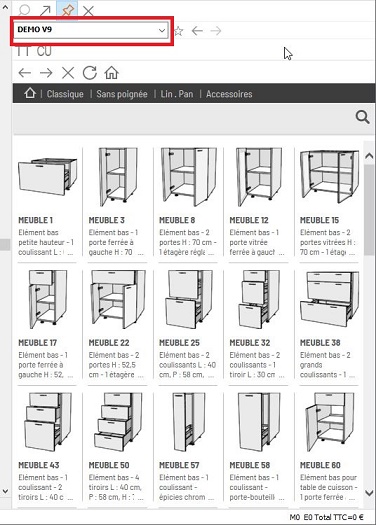
1. Choose a catalogue from the list. In our example, we will choose the catalogue nammed '''@DEMO V9''' which contains the piece of furniture we wish to place. To do so, click on the black downward-pointing arrow button on the right of the catalogue list box. The drop down menu will display all the available catalogues in your system (Fig.a). | 1. Choose a catalogue from the list. In our example, we will choose the catalogue nammed '''@DEMO V9''' which contains the piece of furniture we wish to place. To do so, click on the black downward-pointing arrow button on the right of the catalogue list box. The drop down menu will display all the available catalogues in your system (Fig.a). | ||
| Line 44: | Line 44: | ||
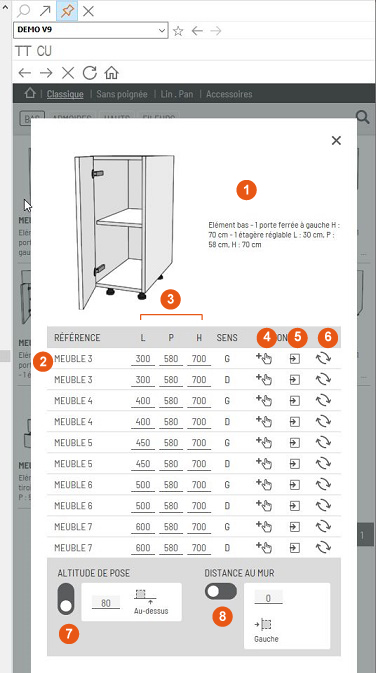
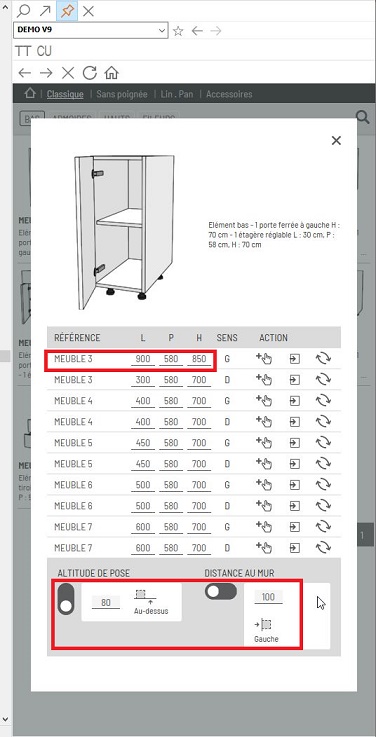
''1''' - Article description. | '''1''' - Article description. | ||
''2''' - Article reference with its dimensions and opening direction (L) or (R). | '''2''' - Article reference with its dimensions and opening direction (L) or (R). | ||
''3''' - The modifiable dimensions of the piece of furniture with Width (W), Depth (D) and Height (H). | '''3''' - The modifiable dimensions of the piece of furniture with Width (W), Depth (D) and Height (H). | ||
''4''' - Button for placing the furniture in the scene. | '''4''' - Button for placing the furniture in the scene. | ||
''5''' - Button for linking an object with another element. | '''5''' - Button for linking an object with another element. | ||
''6''' - Button for replacing one article with another. | '''6''' - Button for replacing one article with another. | ||
''7''' - Button for the placement height in relation to the bottom or the top of the wall. | '''7''' - Button for the placement height in relation to the bottom or the top of the wall. | ||
''8''' - Button for placement distance in relation to the right or the left of the wall. | '''8''' - Button for placement distance in relation to the right or the left of the wall. | ||
5. Replace the default dimensions in the "W", "D" and "H" text boxes with the width, depth and height of the piece of furniture in millimetres. | '''5'''. Replace the default dimensions in the "W", "D" and "H" text boxes with the width, depth and height of the piece of furniture in millimetres. | ||
For example, let's enter 900 for "W" and 850 for "H" for the reference ''' FURNITURE 3 ''' (Fig.d) | For example, let's enter 900 for "W" and 850 for "H" for the reference ''' FURNITURE 3 ''' (Fig.d) | ||
6.In '''PLACEMENT HEIGHT''', we will enter a value of 80, representing the distance between the placement height and your floor. If you want your piece of furniture to be | '''6'''.In '''PLACEMENT HEIGHT''', we will enter a value of 80, representing the distance between the placement height and your floor. If you want your piece of furniture to be | ||
precisely placed, in the ''' DISTANCE TO WALL ''' box, enter the distance separating the piece of furniture from the end of the wall to its left or | precisely placed, in the ''' DISTANCE TO WALL ''' box, enter the distance separating the piece of furniture from the end of the wall to its left or | ||
to its right. To do so, move the slider to the left or to the right. You can tell which side is the left or the right when looking at the piece of furniture from inside | to its right. To do so, move the slider to the left or to the right. You can tell which side is the left or the right when looking at the piece of furniture from inside | ||
| Line 77: | Line 77: | ||
</div> | </div> | ||
7. In the chosen article's previsualisation graphic zone, click with your left mouse button and keep it pressed down. The mouse cursor will transform into the silhouette of a hand. | '''7'''. In the chosen article's previsualisation graphic zone, click with your left mouse button and keep it pressed down. The mouse cursor will transform into the silhouette of a hand. | ||
8. Slide the mouse cursor towards the work area to where the article should be. Note that the silhouette of the article slides along with the mouse cursor. A right click (with the left mouse button still pressed down) will swivel the article silhouette 45 degrees to the right. | '''8'''. Slide the mouse cursor towards the work area to where the article should be. Note that the silhouette of the article slides along with the mouse cursor. A right click (with the left mouse button still pressed down) will swivel the article silhouette 45 degrees to the right. | ||
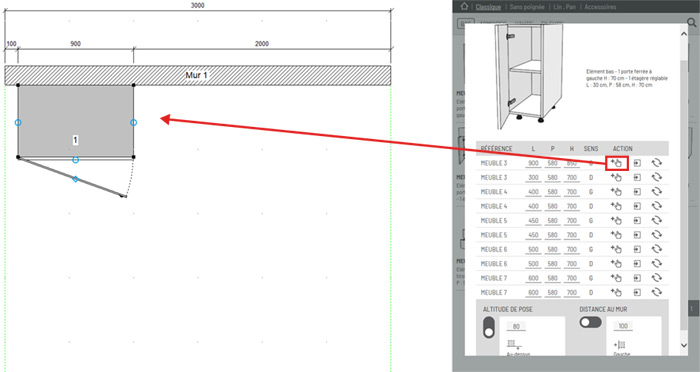
9. Release the left mouse button and the article will be placed 80 mm from the floor in the desired spot (Fig.e). If you release it in the wall, the piece of furniture will be placed 100 mm from the left of the wall. | '''9'''. Release the left mouse button and the article will be placed 80 mm from the floor in the desired spot (Fig.e). If you release it in the wall, the piece of furniture will be placed 100 mm from the left of the wall. | ||
You can also place the piece of furniture directly by clicking on the button in the shape of a hand. The piece of furniture will then automatically be placed in the desired spot (which is to say 100 mm from the left wall). | You can also place the piece of furniture directly by clicking on the button in the shape of a hand. The piece of furniture will then automatically be placed in the desired spot (which is to say 100 mm from the left wall). | ||
| Line 93: | Line 93: | ||
</div> | </div> | ||
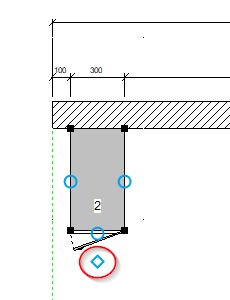
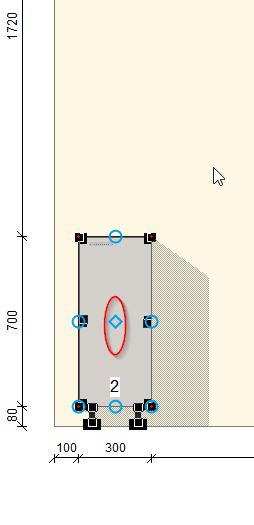
''Hinged side''' | '''Hinged side''' | ||
It's possible to change the hinged side of an article directly in the scene by clicking on the blue diamond. | It's possible to change the hinged side of an article directly in the scene by clicking on the blue diamond. | ||
| Line 101: | Line 101: | ||
[[Image:meuble7.jpg|left|link=]] [[Image:meuble8.jpg]] | [[Image:meuble7.jpg|left|link=]] [[Image:meuble8.jpg]] | ||
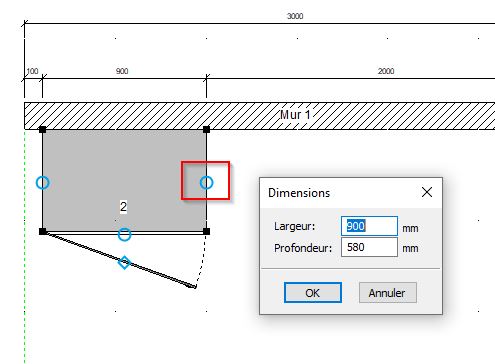
''Dimensions dialog box''' | '''Dimensions dialog box''' | ||
It's possible to open a dialog box that contains the dimensions of an article by clicking on one of the little blue circles. | It's possible to open a dialog box that contains the dimensions of an article by clicking on one of the little blue circles. | ||
| Line 112: | Line 112: | ||
</div> | </div> | ||
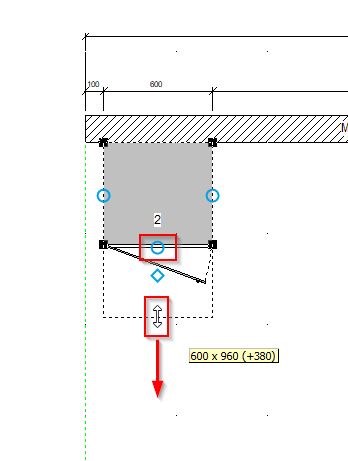
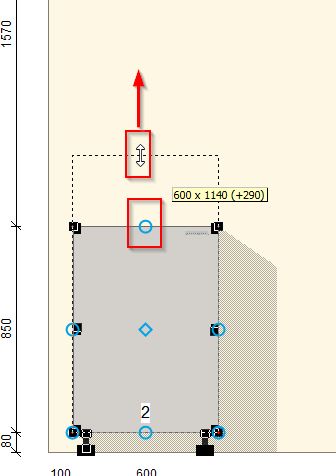
''Changing the dimensions of a piece of furniture with your mouse''' | '''Changing the dimensions of a piece of furniture with your mouse''' | ||
You can stretch the furniture in width and in depth with the help of the little blue circles of the selected article by keeping your mouse button pressed down. If the piece of furniture is only available in certain widths and depths, then the system will allow "steps" to the available dimensions but will not offer any measurements that aren't authorised by the catalogue. | You can stretch the furniture in width and in depth with the help of the little blue circles of the selected article by keeping your mouse button pressed down. If the piece of furniture is only available in certain widths and depths, then the system will allow "steps" to the available dimensions but will not offer any measurements that aren't authorised by the catalogue. | ||
