360 Panorama: Difference between revisions
(Created page with "PANORAMA") |
No edit summary |
||
| Line 1: | Line 1: | ||
<table width="100%"> | |||
<tr> | |||
<td width="80%" valign="top"> | |||
<!-- contenu --> | |||
<tr> | |||
<td width="80%"> | |||
<!-- contenu --> | |||
<div align="center"> | |||
<p class="cadrevideo"> | |||
<youtube width="500" height="300"> | |||
https://www.youtube.com/watch?v=t7MDslHptpo&list=PL7MrU2icgiqExU__D_85jiV85DuHHNYJZ&index=5 | |||
</youtube> | |||
<br>Voir le tutoriel vidéo | |||
</p></div> | |||
The 360° panorama is fantastic tool for helping with both sales and communication. It generates a 360° 3D panorama of your room. | |||
This panorama can be displayed on a computer, a tablet or a mobile phone and can be very easily sent by email to the final customer. | |||
<strong>[http://www.myinsitu.com/Pano.htm?panoDir=/KDPanos/pano_0_org Voir un exemple de panorama 360]</strong> | |||
<strong>[https://www.applicatools.com/Viewer1/pano.htm?panoDir=/panoramas/895790705-145783625 Voir un exemple de Panorama 360° multi vues]</strong> | |||
As you can see, it allows you to visualise the entirety of the project while being able to change the point of view thanks to the dots. | |||
When you have finished your project, make sure that you save your [[Placer le champ de vision|visual frields]]. | |||
You can also generate 360° panoramas without visual fields. In that case, the panroama is generated from the middle of the room or the view at the time. | |||
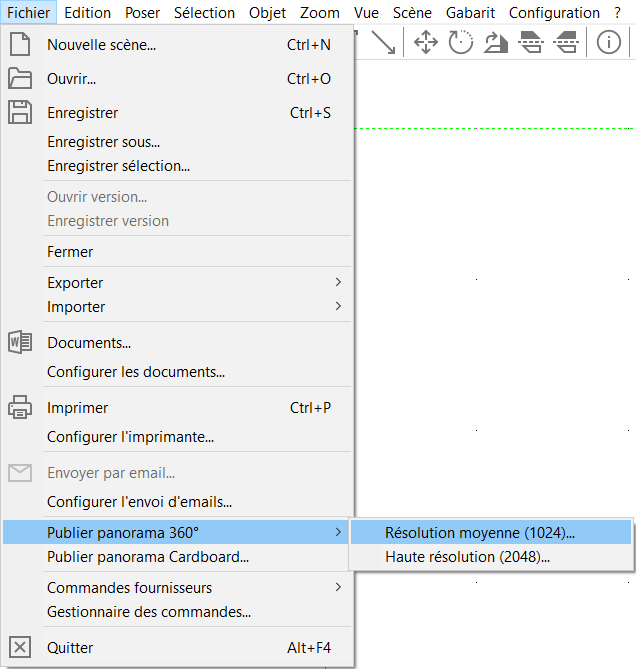
Go to the "file" drop down menu and then choose "Post 360° Panorama". | |||
<div align="center"> | |||
<p class="cadreimg"> | |||
[[Image:Panorama360_FR.PNG]] | |||
</p></div> | |||
Two different resolutions are available: | |||
Medium resolution (1024 pixels) | |||
High resolution (2048 pixels) | |||
Careful, the high resolution will take longer to generate. Also be aware that the calculations use your computer's processing power, which means it's an important factor to take into account... | |||
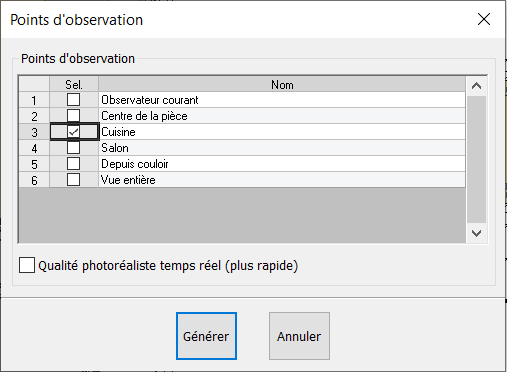
Once you have chosen the resolution you want, you can choose the number of points of view from which you want the panorama to be generated. | |||
Once again, the more points of view chosen, the longer the panorama will take to generate. These points of views, in other words, the visual fields that were saved previously, will then become the dots that let you change your point of view. | |||
<div align="center"> | |||
<p class="cadreimg"> | |||
[[Image:Panorama2_FR.PNG]] | |||
</p></div> | |||
You can also choose the real time photorealistic quality to generate a 360 much quicker but of lower quality. | |||
When it has finished, the software will open the panorama on an Internet page. | |||
You can copy and paste the link and then send it to your client via email. | |||
<p style="border:solid 1px #ea560d;border-radius:5px;background-color:#f6f6f6;padding:10px"> To easily find your links, we suggest creating an excel or similar file and pasting the various links you have generated. It will be much easier to sort through them. </p> | |||
<!-- fin contenu --> | |||
</td> | |||
<td valign="top" width="20%"> | |||
{{:En_Visualiser}} | |||
</td> | |||
</tr> | |||
</table> | |||
<span class="btnretour">[[#top|Retour haut de page]]</span> <span class="btnhome">[[Le WebShare|Etape suivante]]</span> | |||
Revision as of 15:38, 3 July 2023
|
The 360° panorama is fantastic tool for helping with both sales and communication. It generates a 360° 3D panorama of your room. This panorama can be displayed on a computer, a tablet or a mobile phone and can be very easily sent by email to the final customer. Voir un exemple de panorama 360 Voir un exemple de Panorama 360° multi vues As you can see, it allows you to visualise the entirety of the project while being able to change the point of view thanks to the dots.
When you have finished your project, make sure that you save your visual frields.
Go to the "file" drop down menu and then choose "Post 360° Panorama".
Careful, the high resolution will take longer to generate. Also be aware that the calculations use your computer's processing power, which means it's an important factor to take into account... Once you have chosen the resolution you want, you can choose the number of points of view from which you want the panorama to be generated. Once again, the more points of view chosen, the longer the panorama will take to generate. These points of views, in other words, the visual fields that were saved previously, will then become the dots that let you change your point of view. You can also choose the real time photorealistic quality to generate a 360 much quicker but of lower quality. When it has finished, the software will open the panorama on an Internet page. You can copy and paste the link and then send it to your client via email.
To easily find your links, we suggest creating an excel or similar file and pasting the various links you have generated. It will be much easier to sort through them.
|
|


