Creating angles
Understanding the Place windowSetting up a 90° or 135° angle
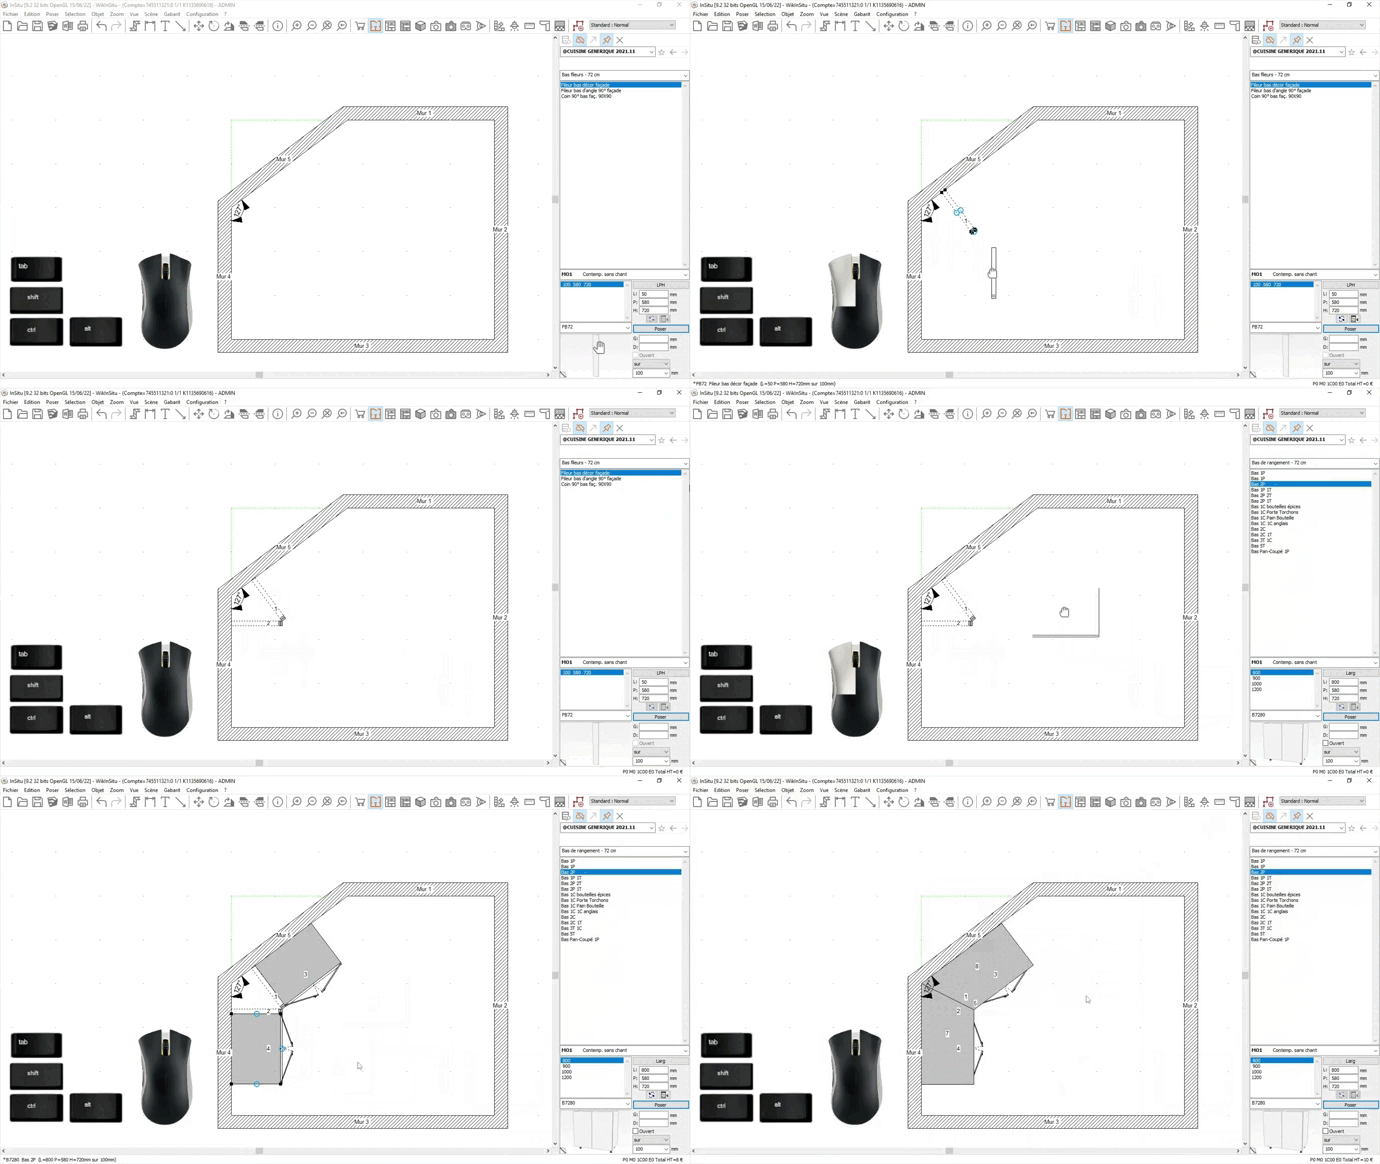
Some manufacturer catalogues contain what is called a graphic filler aid. A graphic filler aid is a sort of silhouette that can be wedged into an angle the same way that you place angle furniture. This makes it a lot easier to place the angle filler. For manufacturer catalogues without a graphic failler aid, here is a method for easily and precisely placing your angle fillers. Firstly, let's place what we call the zones for each side of the angle. These zones are silhouettes that will help you easily visualise the space that you want to design and therefore, where to place the filler. Choose Place | Zone. The zone can be placed in 3 clicks. A first click on the extremity of the first wall, a second click on the other extremity of the wall and a third click will allow you to place the zone. When you right click on this zone, you can choose the length and most importantly the depth of the zone in attributes. Let's imagine that the standard depth of the manufacturer catalogue you are using is 580 mm and that you want to place a façade aligned angle filler. Therefore, you want your zone to have a depth of 580 mm. By clicking on "by default", then all the zones you place in the future will use that depth by default. Of course, if you need to change the depth, then you can easily do so in the attributes of the zone. Now, click on OK. Our first zone has now been placed. Next, using the same method, place the second zone but on the other wall. Now, you have an accurate view of the zone that you are designing and, more importantly, perfect visibility of the spot that you want to place your angle filler. Pick the angle filler in the catalogue and do a drag and drop. Don't hesitate to use the move tool for a more precise positioning of the filler. With this method, the automatic linears are placed without any difficulty.
If placing a 90° or 135° angle filler is child's play thanks to the use of graphic aids from the manufacturer catalogues, placing fillers of different angles is considerably harder. Let's see how to fix this problem. First of all, if you struggle to place 90° or 135° angle fillers, then please refer to the tutorial dedicated to them. When setting up angles other than 90° or 135°, the main difficulty is placing the fillers. Indeed, if they are badly placed, then the whole scene is likely to be flawed and the automatic linears won't work. To overcome this difficulty, stick to the following method: 127° angle example Firstly, select a simple angle filler. It can be either outward facing or furniture facing, it doesn't matter. Enter the desired width. Then, keep the CTRL button pressed down on your keyboard and only release it once the filler has been correctly placed. Drag and drop teh filler. The filler must be positioned in the angle so that the back of the filler is facing one of the two walls. Always release the mouse first before releasing the CTRL key.
Do the same with the second filler but this time around, position it so that the back of the filler is facing the other wall... Remember to release the CTRL button last. Your fillers are now well positioned. All you need to do is place the furniture and launch the automatic linears. When using this method, everything will be automatically, and more importantly correctly, positioned.
|
|

