Creating overflows, circular arcs
|
You can perform various operations on these lines. You can create overhangs for your islands, make a rounded drawing…
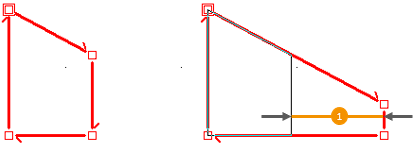
1. Select the dots defining the consecutive or non-consecutive lines on which you wish to apply an overhang. To know how to select several dots of a shape, head to the Sélectionner les points d'un gabarit section. 2. Select Shape | Modify | Overhang. "The overhang text box refers to the débord value expressed in the scene’s units of measurement. A positive value leads to an overhang in the direction of the appendages on the ends of lines, and a negative value leads to an overhang in the opposite direction. " 3. Enter the value of the overhang and confirm. This type of overhang will change the angles if they are not multiples of 90°, as illustrated in the figure below:
1. Select the dots defining the consecutive or non-consecutive lines on which you wish to apply an overhang. To know how to select several dots of a shape, head to the Sélectionner les points d'un gabarit section. 2. Select Shape | Modify | Overhang respecting the angles. The Overhang text box refers to the value of the extension of the line expressed in the scene’s units of measurement. A positive value leads to an extension towards the appendages on the ends of the lines and a negative value leads to an extension in the other direction. 3. Enter the value of the overhang and confirm. This type of overhang will maintain the angles of the lines that are affected by the overhang, as illustrated in the figure below:
1. Select the dots defining the consecutive or non-consecutive lines on which you wish to generate a rectangular overhang. To know how to select several dots of a shape, head to the Sélectionner les points d'un gabarit section. 2. Select Shape | Modify | Rectangular overhang The Overhang text box represents the depth of the overhang. 3. Enter the overhang's value and confirm.
Generating an overhang in circular arcs 1. Select the dots defining the consecutive or non-consecutive lines on which you wish to generate an overhang in circular arcs. To know how to select several dots of a shape, head to the Sélectionner les points d'un gabarit section. 2. Select Shape | Modify | Overhang in circular arcs. The Arrow text box refers to the depth of the overhanf in its most distant point from the line and the Lines text box refers to the number of lines to generate in order to draw the circular arc. 3. Enter the arrow value and the number of lines to generate and then confirm.
Circular arcs In the shapes, circular arcs are simulated by a round dot. This allows you to transmit the exact form of the work plans to the manufacturer. To do so, select Shape | Dots | Circular arcs. You can transform these dots to represent the circular arcs into little lines by using the Shape | Modify | Circular arcs into lines feature. Then, in the Circular arcs into lines dialog box, choose the number of lines to define the rounding (here: 16).
|
|


