Setting up graphic options: Difference between revisions

From WikInsituEn
Jump to navigation Jump to search
No edit summary
No edit summary
Line 3: Line 3:
<td width="80%">
<td width="80%">
<!-- contenu -->
<!-- contenu -->
Le menu configuration graphique vous permettra de configurer certaines options liées au rendu graphique d'insitu.  
The graphic setup menu allows you to set up certain options linked to InSitu's graphics rendering.  


Allez dans le menu '''Configuration | Graphique | Options...''' pour afficher les options.
Go to '''Setup | Graphics | Options''' to display the various options.  


<div align="center">
Line 12: Line 12:
</p></div>
</p></div>


<strong>Couleur</strong>
<strong>Colour</strong>
<br/>Permet de changer la couleur des gabarits ou de l’équerre et du pointeau.
<br/>Allows you to change the colours of the templates or the set square and needle.  
<br/>
<br/>
<br/>
<br/>
<strong>Taille</strong>
<strong>Size</strong>
<br/>Permet de modifier la taille de l’équerre et du pointeau.
<br/>Allows you to change the size of the set square and needle.  
<br/>
<br/>
<br/>
<br/>
<strong>Avancement automatique de l'équerre</strong>
<strong>Automatic advancement of the set square</strong>
<br/>Positionne automatiquement l'équerre à l'emplacement du prochain objet à poser.
<br/>Automatically positions the set square at the spot that the next object will be placed.  
<br/>
<br/>
<br/>
<br/>
<strong>Silhouette de pose sur l'équerre</strong>
<strong>Placing silhouette on set square</strong>
<br/>Permet d'afficher l’aperçu de l'objet et sa position sur l'équerre avant de la poser.
<br/>Allows you to display the preview of the object and its position on the set square before placing it.  
<br/>
<br/>
<br/>
<br/>
<strong>Calques par mode de visualisation</strong>
<strong>Layers by visualisation mode</strong>
<br/>Lorsque l'on crée des calques dans le menu déroulant "scène" puis "calques", on peut décider de ne créer des calques que pour une vue donnée ou pour toutes les vues. Si l'option "calques par mode de visualisation" est cochée, les calques ne seront pas repris pour les autres vues.
<br/>When creating layers by going to the "Scene" drop down menu and then clicking "layers", you can decide whether the layers are displayed in all views or just specific views. If the option "Layers by visualisation mode" is ticked, the layers will not displayed in other views.
<br/>
<br/>
<br/>
<br/>
<strong>Chargement différé des 3D</strong>
<strong>Delayed 3D loading</strong>
<br/>Ne charge les 3D que lorsque l'on passe en mode de visualisation 3D. Cela permet d'alléger l'ouverture d'une scène par exemple.
<br/>Only loads 3D when changing to 3D viewing mode. It helps lighten the opening of a scene, for example.  
<br/>
<br/>
<br/>
<br/>
<strong>Ne pas charger les détails</strong>
<strong>Not loading details</strong>
<br/>Permet de ne pas charger certains détails de meubles comme par exemple les pieds.
<br/>Allows you to not load certain details of furniture, such as feet.  
<br/>
<br/>
<br/>
<br/>
<strong>Cotation automatique en vue de dessus</strong>
<strong>Automatic measuring in top view</strong>
<br/>Permet d'afficher automatiquement ou non les cotations en vue de dessus.
<br/>Allows you to display (or not) the measurements when in top view.  
<br/>
<br/>
<br/>
<br/>
<strong>Cotation automatique en élévation</strong>
<strong>Automatic measuring in elevation</strong>
<br/>Permet d'afficher automatiquement ou non les cotations en élévation.
<br/>Allows you to display (or not) the measurements in elevation view.  
<br/>
<br/>
<br/>
<br/>
<strong>Cacher les murs gênants</strong>
<strong>Hiding awkward walls</strong>
<br/>Permet de cacher ou non les murs gênants la visualisation des éléments de la pièce en 3D.
<br/>Allows you to hide (or not) the walls that are making the visualisation of 3D elements in the room difficult.
<br/>
<br/>
<br/>
<br/>
<strong>Utiliser DirectX 9 à la place de DirectX 11</strong>
<strong>Using DirectX 9 instead of DirectX 11</strong>
<br/>Permet de passer sur un calcul de la 3D en DirectX 9 à la place d'un calcul 3D en DirectX 11.
<br/> Allows you to do a 3D calculation in DirectX 9 rather than doing a 3D calculation in DirectX 11.  
<br/>
<br/>
<br/>
<br/>
<strong>Marge d'ancrage</strong>
<strong>Anchoring margin</strong>
<br/>Chaque objet a des points d'ancrage que le système repère dès qu'on approche le curseur. La marge d'ancrage permet au système de se caler sur les points d'ancrage. Si elle est faible, cela signifie qu'il faudra beaucoup s'approcher du point d'ancrage pour que l'aimantation se fasse ; si elle est plus élevée, l'aimantation se fera à partir de plus loin.
<br/>Every object has anchor points that the system that the system identifies whenever the cursor approaches. The anchoring margin allows the system to wedge itself onto the anchor points. If it is weak, that means that you will need to get very close to the anchor point for the magnetisation to work; if it is higher, then magnetisation can be done from further away.  
<br/>
<br/>
<br/>
<br/>

Revision as of 14:14, 13 March 2023

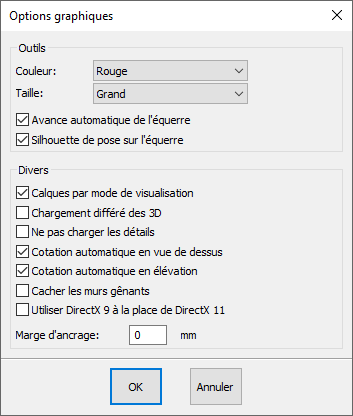
The graphic setup menu allows you to set up certain options linked to InSitu's graphics rendering.

Go to Setup | Graphics | Options to display the various options.

ConfigOptionGraphiqueFR2.png

Colour
Allows you to change the colours of the templates or the set square and needle.

Size
Allows you to change the size of the set square and needle.

Automatic advancement of the set square
Automatically positions the set square at the spot that the next object will be placed.

Placing silhouette on set square
Allows you to display the preview of the object and its position on the set square before placing it.

Layers by visualisation mode
When creating layers by going to the "Scene" drop down menu and then clicking "layers", you can decide whether the layers are displayed in all views or just specific views. If the option "Layers by visualisation mode" is ticked, the layers will not displayed in other views.

Delayed 3D loading
Only loads 3D when changing to 3D viewing mode. It helps lighten the opening of a scene, for example.

Not loading details
Allows you to not load certain details of furniture, such as feet.

Automatic measuring in top view
Allows you to display (or not) the measurements when in top view.

Automatic measuring in elevation
Allows you to display (or not) the measurements in elevation view.

Hiding awkward walls
Allows you to hide (or not) the walls that are making the visualisation of 3D elements in the room difficult.

Using DirectX 9 instead of DirectX 11
Allows you to do a 3D calculation in DirectX 9 rather than doing a 3D calculation in DirectX 11.

Anchoring margin
Every object has anchor points that the system that the system identifies whenever the cursor approaches. The anchoring margin allows the system to wedge itself onto the anchor points. If it is weak, that means that you will need to get very close to the anchor point for the magnetisation to work; if it is higher, then magnetisation can be done from further away.


Configuration.png
Set up

Retour haut de page  Etape suivante