Configuring your timetable: Difference between revisions
Jump to navigation
Jump to search
No edit summary |
No edit summary |
||
| (One intermediate revision by the same user not shown) | |||
| Line 2: | Line 2: | ||
<tr> | <tr> | ||
<td width="80%"> | <td width="80%"> | ||
<h1 class="title_page">Configuring your timetable</h1> | |||
<!-- contenu --> | <!-- contenu --> | ||
In order to manage your deadlines, you have the option of setting up a payment schedule. | In order to manage your deadlines, you have the option of setting up a payment schedule. | ||
| Line 16: | Line 17: | ||
<p class="cadreimg"> | <p class="cadreimg"> | ||
<span class="img-responsive"> | <span class="img-responsive"> | ||
[[Image: | [[Image:ConfigEcheancierENG1.png|link=]] | ||
</span></p></div> | </span></p></div> | ||
| Line 22: | Line 23: | ||
<p class="cadreimg"> | <p class="cadreimg"> | ||
<span class="img-responsive"> | <span class="img-responsive"> | ||
[[Image: | [[Image:ConfigEcheancierENG2.png|link=]] | ||
</span></p></div> | </span></p></div> | ||
Latest revision as of 14:51, 6 August 2024
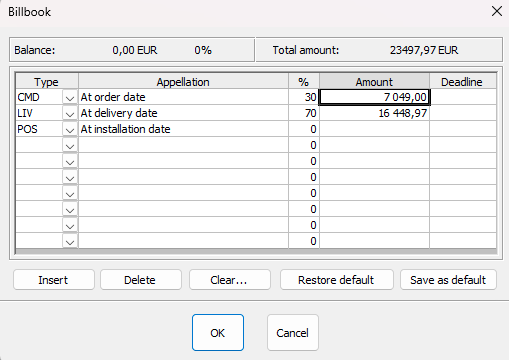
Configuring your timetableIn order to manage your deadlines, you have the option of setting up a payment schedule. Go to the Scene drop down menu and click on Information, this will open up a dialog box. Click on the " Schedule " button, which will open up another dialog box. As needed, change the values, either in the "%" column or in the " Total " column. Click on the " By default " button for the new parameters to take effect for the creation of a new project.
|
|


