Setting up your suppliers: Difference between revisions
Emmanuelle (talk | contribs) No edit summary |
No edit summary |
||
| (7 intermediate revisions by 3 users not shown) | |||
| Line 3: | Line 3: | ||
<td width="80%"> | <td width="80%"> | ||
<!-- contenu --> | <!-- contenu --> | ||
<h1 class="title_page">Setting up your suppliers</h1> | |||
<div align="center"> | <div align="center"> | ||
<p class="cadrevideo"> | <p class="cadrevideo"> | ||
<youtube width="500" height="300"> | <youtube width="500" height="300"> | ||
https://www.youtube.com/watch?v= | https://www.youtube.com/watch?v=rtp1ReAVtyU&list=PL7MrU2icgiqEA7k0fI1Ho7fN6ywu8AAYC&index=2 | ||
</youtube> | </youtube> | ||
<br> | <br>See the video tutorial | ||
</p></div> | </p></div> | ||
<br/> | <br/> | ||
'''<big> | '''<big>How to set the sale price for your articles?</big>''' | ||
Articles originating from manufacturer catalogues are in unit points. Multiply these units by a point value and you will obtain their price excluding tax. You can also calculate your purchase price and minimum sale price recommended for a complete management of your sales. | |||
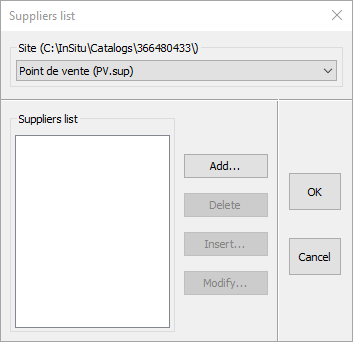
Before setting these coefficients, the catalogues need to be assigned to a supplier by clicking on "'Setup | Pricing | Supplier" | |||
<div align="center"> | <div align="center"> | ||
<p class="cadreimg"> | <p class="cadreimg"> | ||
[[Image: | [[Image:ConfigFournisseurENG1.png|link=]] | ||
</p></div> | </p></div> | ||
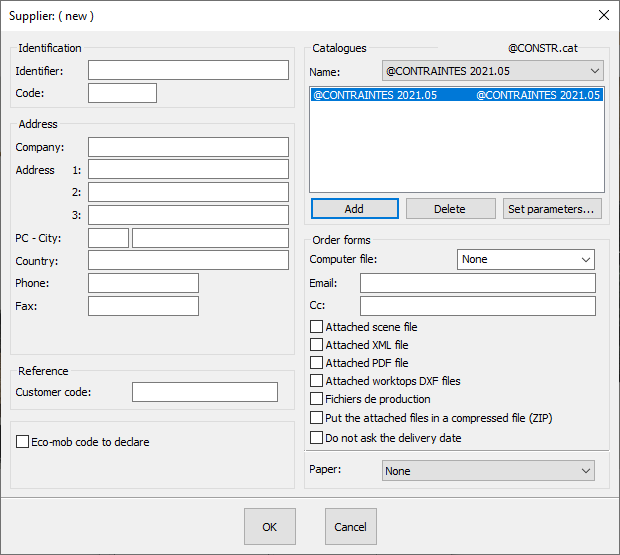
Fill in the dialog box. An identifier is mandatory. | |||
<div align="center"> | <div align="center"> | ||
<p class="cadreimg"> | <p class="cadreimg"> | ||
[[Image: | [[Image:ConfigFournisseurENG2.png|link=]] | ||
</p></div> | </p></div> | ||
<span class="chiffre info">i</span> | <span class="chiffre info">i</span> The "Purchase order" zone allows you to choose the format for the computer file, its mode of transmission with the email address and the paper document accepted by the supplier by filling in the various dialog boxes. The work plan drawings can automatically be attached to the manufactuer's order file as well as the implemented lay out by ticking the "Work plan files attached", "Scene file attached". | ||
'''<big>To assign a catalogue to a supplier:</big>''' | |||
<span class="chiffre">1</span> In the "Name" dialog box, select a catalogue to assign to a supplier in the "Catalogues" zone | |||
<span class="chiffre">2</span> Click on the "Add" button. | |||
Repeat these 2 steps for all the catalogues you need to assign to the supplier. | |||
To define the coefficients of a catalogue: | |||
2- | 1- Select the catalogue you want to configure in the list in the "Catalogues" section that you have just added to. | ||
2- Click on the "Configure" button and a dialog box with the catalogue's name will appear on your screen. | |||
3- Click on the "By models" button, and the Coefficients per model window will appear on screen. It contains the list of models in the chosen catalogue. | |||
<div align="center"> | <div align="center"> | ||
<p class="cadreimg"> | <p class="cadreimg"> | ||
[[Image: | [[Image:ConfigFournisseurENG6.png|link=]] | ||
</p></div> | </p></div> | ||
<div align="center"> | <div align="center"> | ||
<p class="cadreimg"> | <p class="cadreimg"> | ||
[[Image: | [[Image:ConfigFournisseurENG4.png|link=]] | ||
</p></div> | </p></div> | ||
the name (MODELS) | |||
<br/> | <br/>the code | ||
<br/> | <br/>the price group (PG) | ||
<br/> | <br/>the value point: value of the order price of the catalogue expressed in working currency | ||
<br/> | <br/>the purchase coefficient: coefficient applied to the catalogue price to obtain the purchase price (useful for calculating margins) | ||
<br/> | <br/>the minimum sale coefficient: the minimum sale coefficient established by the manager, under which the vendors are allowed to go. The gap between the final sale price and the minimum sale price is the difference. You can choose to display this in the InSitu status bar by going to the Set up | Pricing | Options dialog box. | ||
<br/> | <br/>the recommended slae coefficient: the coefficient that allows you to go from the catalogue price to the initial sale price: the latter can be reduced by a discount or simply by forcing it down. | ||
4- | 4- For each model, fill in the information for all cells that have a white background. The buttons "Copy all models" and "Copy identical PG" allow you to spread the desired coefficients for the selected model to all the models in the catalogue, or the models that have the same price group. | ||
5- | 5- Validate by clicking "OK". | ||
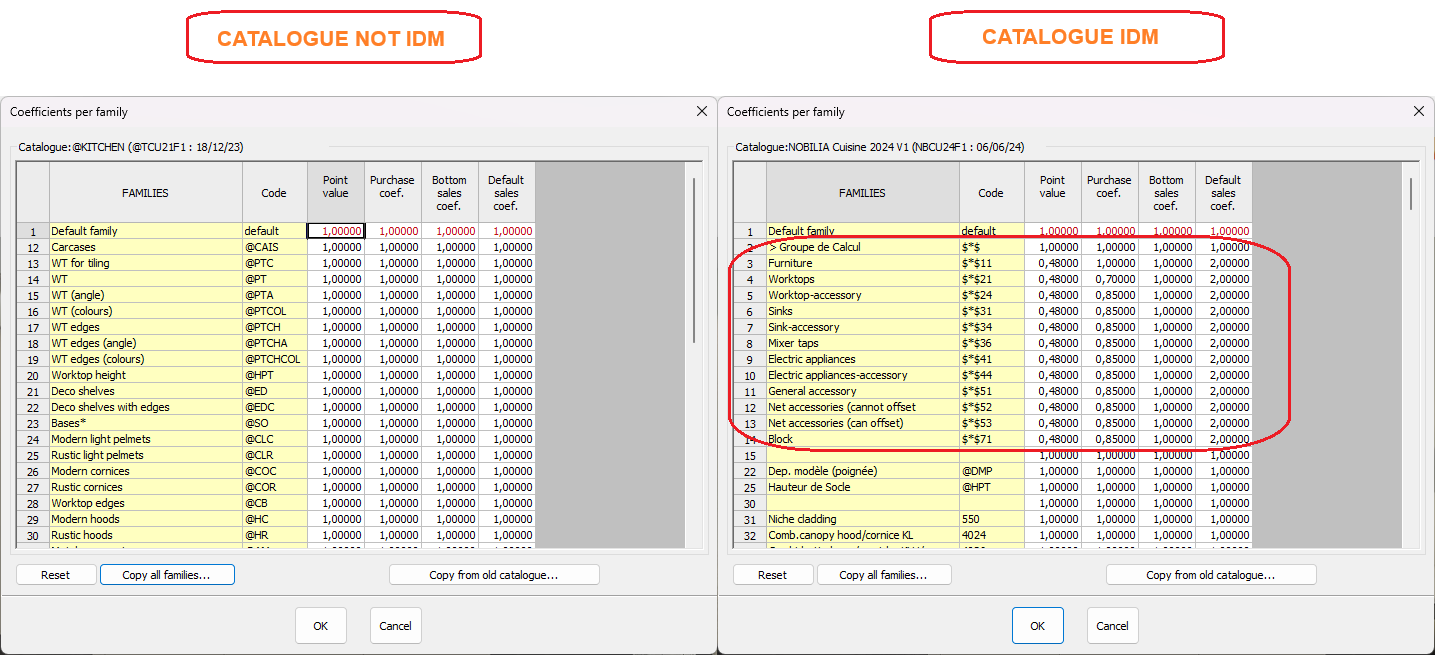
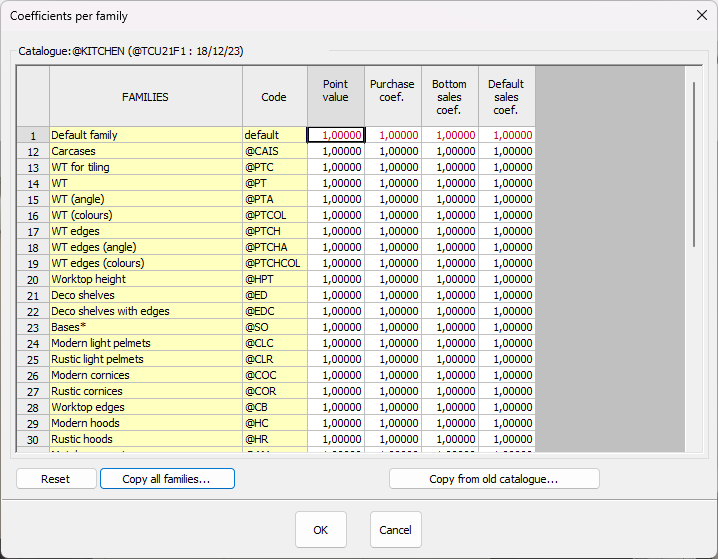
6- | 6- Click on the "By families" button and proceed as you did for the models, but this time for the families of articles that don't depend on the model of the façade; then, validate by clicking "OK". | ||
<div align="center"> | <div align="center"> | ||
<p class="cadreimg"> | <p class="cadreimg"> | ||
[[Image: | [[Image:ConfigFournisseurENG5.png|link=]] | ||
</p></div> | </p></div> | ||
7- | 7- If you want some references to have specific coefficients then you can click on "By article". | ||
8- | 8- Validate all the dialog boxes. | ||
<span class="chiffre">3</span> | <span class="chiffre">3</span>In version 7,0, a box to tick has been added to the supplier dialog box, named Eco-furniture to declare. When setting up a supplier catalogue, this option can be ticked. The information ToBeDeclared is then added to the xml file that's sent to the supplier and allows the total amount of the eco-furniture participation to declare to be evaluated in isolation. | ||
<span class="chiffre info">i</span> <strong><u> | <span class="chiffre info">i</span> <strong><u>Very important</u> : in case the catalogue is updated</strong> | ||
<br/> | <br/> | ||
If a catalogue is updated with a change in the catalogue's .cat name, you must start again from the <strong>To assign a catalogue to a supplier</strong> step and choosing the new catalogue in the drop down menu. | |||
<!-- fin contenu --> | <!-- fin contenu --> | ||
| Line 104: | Line 104: | ||
</table> | </table> | ||
<span class="btnretour">[[#top| | <span class="btnretour">[[#top|Back top of page]]</span> <span class="btnhome">[[Setting up the pricing for your quotes|Next Step]]</span> | ||
Latest revision as of 15:56, 6 August 2024
Setting up your suppliers
Articles originating from manufacturer catalogues are in unit points. Multiply these units by a point value and you will obtain their price excluding tax. You can also calculate your purchase price and minimum sale price recommended for a complete management of your sales. Before setting these coefficients, the catalogues need to be assigned to a supplier by clicking on "'Setup | Pricing | Supplier"
Fill in the dialog box. An identifier is mandatory.
i The "Purchase order" zone allows you to choose the format for the computer file, its mode of transmission with the email address and the paper document accepted by the supplier by filling in the various dialog boxes. The work plan drawings can automatically be attached to the manufactuer's order file as well as the implemented lay out by ticking the "Work plan files attached", "Scene file attached".
1- Select the catalogue you want to configure in the list in the "Catalogues" section that you have just added to. 2- Click on the "Configure" button and a dialog box with the catalogue's name will appear on your screen. 3- Click on the "By models" button, and the Coefficients per model window will appear on screen. It contains the list of models in the chosen catalogue.
the name (MODELS)
4- For each model, fill in the information for all cells that have a white background. The buttons "Copy all models" and "Copy identical PG" allow you to spread the desired coefficients for the selected model to all the models in the catalogue, or the models that have the same price group. 5- Validate by clicking "OK". 6- Click on the "By families" button and proceed as you did for the models, but this time for the families of articles that don't depend on the model of the façade; then, validate by clicking "OK".
7- If you want some references to have specific coefficients then you can click on "By article". 8- Validate all the dialog boxes.
|
|


