Set up Insitu connected to the network: Difference between revisions
No edit summary Tag: Reverted |
No edit summary |
||
| (11 intermediate revisions by 2 users not shown) | |||
| Line 39: | Line 39: | ||
</p></div> | </p></div> | ||
Click on<b>Apply</b> then <b>Close</b> and step 1 of connecting InSitu to a network will be complete. | Click on <b>Apply</b> then <b>Close</b> and step 1 of connecting InSitu to a network will be complete. | ||
''<big>Step 2: Setting up InSitu on the server computer</big>''' | '''<big>Step 2: Setting up InSitu on the server computer</big>''' | ||
Launch InSitu on the server and then go to the <b>System set up | Network</b>. There's nothing to change here, by default the software will copy the paths that you entered at the installation stage. | Launch InSitu on the server and then go to the <b>System set up | Network</b>. There's nothing to change here, by default the software will copy the paths that you entered at the installation stage. | ||
| Line 49: | Line 49: | ||
''<big>Step 3: setting up InSitu on the client computer</big>''' | '''<big>Step 3: setting up InSitu on the client computer</big>''' | ||
Start up InSitu on the client computer and go to the | Start up InSitu on the client computer and go to the '''System set up | Network''' menu. | ||
Go to the | Go to the '''Local directories''' tab. | ||
The InSitu date directories correspond to the directories chosen during the installation or updates. | The InSitu date directories correspond to the directories chosen during the installation or updates. | ||
For | For '''Winword (.EXE)''', the path to the Word program may be different depending on the installations and the versions of Word. | ||
<div align="center"> | <div align="center"> | ||
| Line 65: | Line 65: | ||
Now, go to the | Now, go to the '''Network directories''' tab and fill in the parameters of the network that will allow you to '''[[Synchronise InSitu data|synchronise]]''' (*) the client computer with the server that's home to InSitu. | ||
The information entered in the figure below is an example that is designed to help guide you. Make sure to enter your own parameters. In our example, the name of the server is "server". | The information entered in the figure below is an example that is designed to help guide you. Make sure to enter your own parameters. In our example, the name of the server is "server". | ||
| Line 71: | Line 71: | ||
<div align="center"> | <div align="center"> | ||
<p class="cadreimg"> | <p class="cadreimg"> | ||
[[Image: | [[Image:Installer8ENG.png|link=]] | ||
</p></div> | </p></div> | ||
</td> | |||
<td valign="top" width="20%"> | |||
{{:En_Installer}} | |||
</td> | |||
</tr> | |||
</table> | |||
'''(*) Synchronise''' : to update the information from the server to the client computer and from the client computer to the server. [[Synchroniser les données InSitu|Find out more]] | |||
<!-- fin contenu --> | <!-- fin contenu --> | ||
| Line 83: | Line 93: | ||
<td valign="top" width="20%"> | <td valign="top" width="20%"> | ||
</td> | </td> | ||
| Line 90: | Line 98: | ||
</table> | </table> | ||
<span class="btnretour">[[#top|Back top of page]]</span> <span class="btnhome">[[Synchronise InSitu data|Next Step]]</span> | |||
Latest revision as of 10:22, 5 December 2023
|
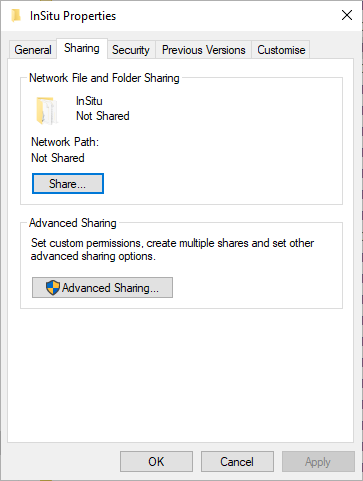
Step 1: sharing the InSitu folder from the server computer Before connecting the InSitu software to a network, you must share the InSitu folder that is on the server with all the client computers Access the server's hard drive and search for the InSitu folder (by default, it will be installed on c:\). Right click the folder to make the shortcut menu appear. Choose the menu Properties. A window with four tabs will appear (General/Sharing/Security/Customise). Select the Sharing tab.
Click on the Advanced sharing button. The window below shall appear. Tick the Share this folder box and then, while staying in the same window, click on the Permissions button.
Next, select the Security tab and tick the Allow for Full control.
Click on Apply then Close and step 1 of connecting InSitu to a network will be complete.
Launch InSitu on the server and then go to the System set up | Network. There's nothing to change here, by default the software will copy the paths that you entered at the installation stage. Be aware that it is not necessary to install InSitu on the server if you only plan on using it as a storage base (with a NAS server for example).
Start up InSitu on the client computer and go to the System set up | Network menu. Go to the Local directories tab. The InSitu date directories correspond to the directories chosen during the installation or updates. For Winword (.EXE), the path to the Word program may be different depending on the installations and the versions of Word.
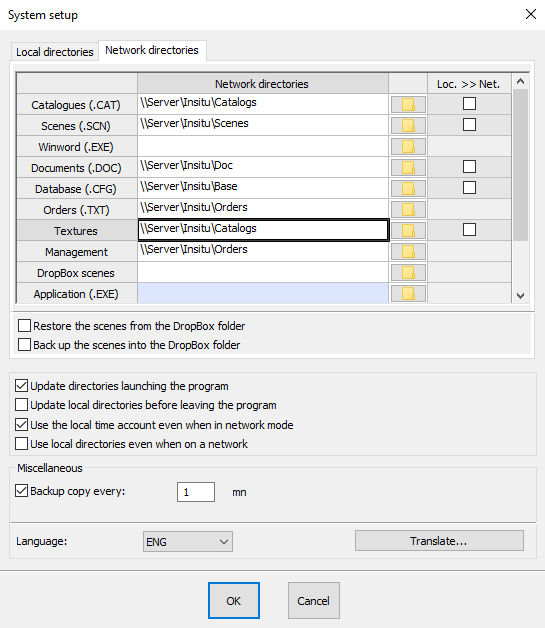
The information entered in the figure below is an example that is designed to help guide you. Make sure to enter your own parameters. In our example, the name of the server is "server".
|
|
(*) Synchronise : to update the information from the server to the client computer and from the client computer to the server. Find out more


