Set a password: Difference between revisions
No edit summary Tag: Reverted |
No edit summary |
||
| (7 intermediate revisions by 3 users not shown) | |||
| Line 3: | Line 3: | ||
<td width="80%"> | <td width="80%"> | ||
<!-- contenu --> | <!-- contenu --> | ||
<h1 class="title_page">Set a password</h1> | |||
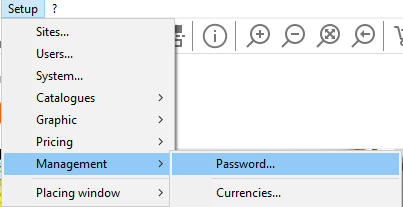
Every user of the software has the option of protecting their user account with a password. To do so, click on '''Setup | Management | Password'''. | |||
<div align="center"> | |||
<p class="cadreimg"> | |||
[[Image:ConfigMdpENG1.png|link=]] | |||
</p> | |||
Fig.4a | |||
<br/> | |||
</div> | |||
'''<big>Changing a password</big>''' | |||
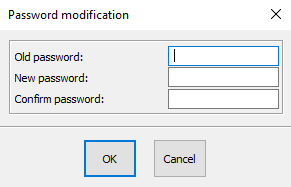
1- In the old password section, enter your old password (leave it blank if you didn't have one). | |||
2- Enter your New password. | |||
3- Type in the same password in the "Confirmation" section. | |||
<div align="center"> | <div align="center"> | ||
<p class="cadreimg"> | <p class="cadreimg"> | ||
[[Image: | [[Image:ConfigMdpENG2.png|link=]] | ||
</p></div> | </p></div> | ||
< | '''<big>Deleting a password</big>''' | ||
< | 1- In the old password section, enter your old password | ||
2- Leave the "New password" section blank. | |||
3- Leave the "Confirmation" section blank. | |||
The password is linked to the user. | |||
If a password is forgotten, you must open InSitu as an administrator so that you can access the users and delete the password, as only an administrator is allowed to access the Setup > Users... menu. | |||
<!-- fin contenu --> | <!-- fin contenu --> | ||
| Line 73: | Line 52: | ||
</table> | </table> | ||
<span class="btnretour">[[#top| | <span class="btnretour">[[#top|Back top of page]]</span> <span class="btnhome">[[Setting up graphic options|Next step]]</span> | ||
Latest revision as of 16:31, 5 August 2024
Set a passwordEvery user of the software has the option of protecting their user account with a password. To do so, click on Setup | Management | Password.
Fig.4a
Changing a password 1- In the old password section, enter your old password (leave it blank if you didn't have one). 2- Enter your New password. 3- Type in the same password in the "Confirmation" section.
1- In the old password section, enter your old password 2- Leave the "New password" section blank. 3- Leave the "Confirmation" section blank. The password is linked to the user. If a password is forgotten, you must open InSitu as an administrator so that you can access the users and delete the password, as only an administrator is allowed to access the Setup > Users... menu.
|
|


